Enhancing Nectari security
By default, when you do an installation, you have a web browser which sends queries to the IIS Website (Nectari Web Client) (set on HTTP by default). Right after, the website will communicate with IIS, then IIS will do the same with the BI Service and finally the BI Service with the SQL Server.
So starting from this point, we already can secure IIS (highly recommanded) and the BI Service (optional depending on if you are using or not Excel Add-In).
In relation to Excel Add-In, if you secure the website (IIS) and make possible external access, it will be sufficient at least for Chrome. However, the login process for Excel Add-In implies a direct connection to the BI Service and therefore all the data (financial information and credentials) will not be encrypted over the internet.
Preliminary steps
Creating a dedicated SQL user (if required)
If for some reasons the customer does not want to give his "sa" user credentials, it is possible to create a user who will be dedicated to Nectari. The main benefit is that contrary to a "sa" user who is based on a Windows authentication, the SQL user password does not need to be changed.
To create a SQL user:
- In a database, expand the Security folder and right-click on Logins folder.
- Select New Login.
- In the Login Name field, enter a name for your user.
- Select SQL Server Authentification.
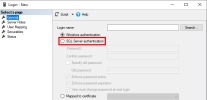
- Define a password and specify or not if you want to enhance the password security then leave the remaining fields to their default value.
- In the Server Roles tab, select sysadmin.
- In the User Mapping tab, tick the database(s) on which you want the user to have specific roles and choose db_datareader, db_datawriter, db_ddladmin among the roles.
- Click on OK.
Securing Central Point folder
After installing the Central Point, change the Sharing and Security permissions so that only this user can access it.
- Right-click on the Central Point folder and select Properties.
- In the Sharing tab, click on Advanced Sharing...
- In the Advanced Sharing window, click on Permissions.
- Click on Add.

- In the Enter the object names to select field, add the local administrator and click on OK.
- In the Permissions for Central Point window, grant Full Control to the local admin and click on Apply then OK.Note
It is not mandatory but if you want to restrict a little bit further the access to the Central Point folder, you can also delete the Everyone user.
- Click on OK to get back to the Central Point Properties window.
- In the Security tab, click on Edit.
- Click on Add.
- In the Enter the object names to select field, add the local administrator and click on OK.
- In the Permissions for Central Point window, grant Full Control to the local admin and click on Apply then OK.Note
It is not mandatory but if you want to restrict a little bit further the access to the Central Point folder, you can also delete the Everyone user.
- Click on Apply then OK to leave the Central Point Properties window.
Updating the BI Services
As you secured the Central Point, you need now to define which user will use the three services (BI Distribution Service, BI Job Service and BI Service).
- Press the Windows key + R to open the Run window.
- Enter services.msc and press the Enter key.
- In the list, find the lines BI Job Service, BI Service, BI Distribution Service and do the following to each:
- Right-click on the service and select Properties.
- In the Log on tab, select This account and click on Browse to add the local administrator account.
- Enter the password of this account and click on Apply then OK.
Setting up the Central Point Configurator
If for instance the customer wants to change his SMTP, the password or SQL user, this can only be done through the Central Point Configurator. You need to change also the permissions of the Central Point Configurator otherwise it won't be able to write to the Central Point to record changes. In order to do so:
- Press the Windows key + R to open the Run window.
- Enter inetmgr and press the Enter key.
- On the left pane, click on the little arrow to expand the connection.
- In the Application Pools tab, right-click on CPConfiguratorPool and select Advanced Settings....
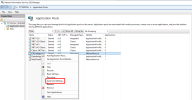
- Under the Process Model section, click on the Identity field and change its value by clicking on the three dots.

- In the Application Pool Identity window, select Custom account and click on Set...
- In the Set Credentials window, enter the user name and password of the local administrator account and click on OK three times.
- In the Application Pools tab, right-click on WebClientPool and select Advanced Settings...
- Repeat the steps 4 to 6.
Installing the Certificate
Before starting anything:
- Make sure you possess a valid certificate with a .pfx extension provided by the customer (refer toChecking the Certificate expiry date for more details).
- Make sure that this certificate was issued by a Certificate Authority (if you have a Self-signed certificate, the Excel Add-In won't work).
- Open the certificate.
- In the Certification Import Wizard window, select Local Machine (to be available for the whole server and not just for one specific user).
- Click on Next twice.
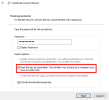
- In the Password field, enter the password provided by the customer and tick the Mark this key as exportable. This will allow you to back up and transport your keys at a later time. checkbox.
 Tip
TipTicking this checkbox can help you reusing this key to install several servers (for example, one server for the Web and another one for the Distribution) and set them up.
- Click on Next twice.
- Click on Finish then OK at the confirmation message box.
Checking the Certificate expiry date
- Press the Windows key + R to open the Run window.
- Enter certmgr.msc and press the Enter key.
- In the left pane, expand the Personal folder and click on Certificates.
- On the right, check the certificate date under the Expiration Date column.
Determining the Certificate type
In the Certificates Management window (enter certmgr.msc in a Run window and press the Enter key:
- Double-click on the certificate to open it.
- Under the General tab, at the Issued to line, check if it's a wildcard certificate (*.domainname = applicable to a domain and all its subdomains) or if it's a certificate applicable only to specific name(s)).
- If it's applicable to specific name(s), go to the Details tab and click on the Subject Alternative Name field to get all the names authorized by the certificate.Note
Write these names down in a notepad as you will need them later on for the installation process (refer to Installing Nectari Business Intelligence).
ImportantOnly the names among the list are authorized to get access to the Web Central Point configurator. Any other names will be blocked.
- Close the window.
Installing Nectari in HTTPS
Uninstalling any previous version (if required)
If you already have installed Nectari, you will have to uninstall it.
Before uninstalling, check the port number of the BI Service because it may not be the same as the one we will use (4504) in this the Installation process (refer to Installing Nectari Business Intelligence for more details). If the port number is different, you will get blocked by the firewall. In order to do so:
- Go to C:\Program Files\Nectari\Nectari\Service\objserver and open the BI Service.NetInstaller.exe.config file.
- Check the port number at the <baseAddresses> tag in order to reuse it for the installation.
- Go to Control Panel > Programs > Programs and Features.
- Select Nectari Business Intelligence and click on Uninstall.
- Follow the wizard to remove the software.
Binding the Central Point Configurator
Before doing this process, make sure with the customer that the bindings (Central Point Configurator and Web Client) have been done on his network (DNS) ( = link in the Hosts file the Host name address from the certificate for the Web Central Point to his IP address).
- Press the Windows key + R to open the Run window.
- Enter inetmgr and press the Enter key.
- On the left pane, click on the little arrow to expand the connection.
- In the Sites tab, right-click on CPConfigurator and select Edit Bindings...
- In the Site Bindings window, click on Add...
- In the Type drop-down list, select https.Note
By default, the port number for https connection is 443. Leave it to the default value.
- In the Host name field, enter webcp.*domain name from the certificate* if it's a wildcard certificate otherwise the Host name must be the same as one of the name(s) within the authorized list (refer to Determining the Certificate type for more details).
- In the SSL certificate drop-down list, select the certificate you installed earlier and click on OK.
- Back to the Site Bindings window, select the http line ad click on Remove.
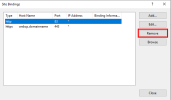
- Click on OK to confirm then on Close.
Binding the Certificate
- Press the Windows key + R to open the Run window.
- Enter powershell and press the Enter key.
- Copy and paste this command and press the Enter key:
Get-ChildItem -path cert:\LocalMachine\My - Copy the Thumbprint of your certificate (it's the first line) and paste it to a notepad.

- Back to the PowerShell window, copy and paste this command and press the Enter key:
netsh http add urlacl url=https://+:4504/ user="EVERYONE" - Copy and paste this command to a notepad (the same notepad where you put the thumbprint):
netsh http add sslcert ipport=0.0.0.0:4504 certhash=afabc3fe7f3eb1ce420ba02065e57f74652d631 appid={00000000-0000-0000-0000-000000000000} - Replace the value of the certhash ("afabc...31) with the Thumbprint ('7EC...A9 in this case).
- In the PowerShell window, enter netsh then press the Enter key.
- Enter http then press the Enter key.
- Paste the rest of the command line ( add sslcert... 0}) and press the Enter key.

Installing Nectari Business Intelligence
- Run the application Nectari - Server - Win64.exe and click on Next.
- For the question Do you want to specify a user account for the Services, select Yes and click on Next.
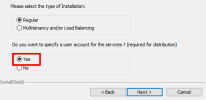
- For the BI Service User Account, enter the credentials of the local administrator and click on Next.
- In the Path field for the Central Point Configuration, enter the address where is located the Central Point folder.
- In the Name field, enter the name you want and click on Next.
- In the BI Server Address field, enter one of the name authorized by the certificate or specify a name while using the domain provided by the certificate if the certificate is a Wildcard type (refer to Determining the Certificate type for more details).
- In the Application Port, reuse the same port that was reserved for the BI Service during the preivous installation (refer to Uninstalling any previous version (if required)Note
By default, the port number is 4504.
- Select Secure and click on Next.
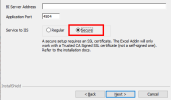
- In the Web Client Port field, leave it to 81 (as the port 443 is already used by the Central Point Configurator.)
- For the BI Distribution Configuration, enter the credentials of the local administrator and click on Next.
- Click on Install.
- Click on Finish.
Binding the Web Client
- Press the Windows key + R to open the Run window.
- Enter inetmgr and press the Enter key.
- On the left pane, click on the little arrow to expand the connection.
- In the Sites tab, right-click on Web Client and select Edit Bindings...
- In the Site Bindings window, click on Add...
- In the Type drop-down list, select https.
- Leave the port number to 443.
- In the Host name field, enter the name that will be used to get access to Nectari (it can be Nectari.*domain name from the certificate* if it's a wildcard certificate otherwise the Host name must be the same as one of the name(s) within the authorized list (refer to Determining the Certificate type for more details).
- In the SSL certificate drop-down list, select the certificate you installed earlier and click on OK.
- Back to the Site Bindings window, select the http line ad click on Remove.
- Click on OK to confirm then on Close.
- Go to C:\Program Files\Nectari\Nectari\DistributionService\objDistribution and open theDistributionInstaller.exe.config file.
- Look for the "<add key=WebAppUrl" tag and value.
- Add an "s" to http.
- Change the port number 81 to 443 and save.
- You must also update your cookie management settings in order to complete the binding. For more information on that process, please see Cookie Management.
Completing the steps outlined above will prevent any HTTP connection from working with your Web Client. For example, that would be a problem for setups that use HTTPS for external access and HTTP for internal access.
Updating Excel Add-In
As you apply some changes to secure the services (BI Services etc), you need to update the Excel Add-In in order to reuse it.
- In the Login box, click on the minus sign icon to remove the selected Central Point.
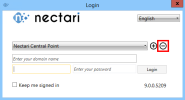
- Click on the plus sign icon.
- In the Add a Central Point window, in the Central Point Path field, enter the address where is located the Central Point folder.
- In the Service Address field, enter the same name (address) that you use as Host name during the binding of the Web Client (refer to Binding the Web Client) and add :4504 (4504 = the port used for the BI Service in this case).
- In the Web URL field, enter the same address you use for the Service Address field but instead of :4504, use :443.
- Click on Add.
- Once the Central Point is added, sign in with your credentials and click on Login.

