Configuring the Connections
Sage XRT Advanced's data is only accessible from OData, so you must synchronize the data from OData with the data in the Nectari data warehouse using DataSync. The Web Client and Excel Add-in will read the data from this data warehouse.
Prior to configuring the source and destinations connections in DataSync, you need the following:
- A Sage XRT Advanced environment
- A Nectari data warehouse (Cloud or On Premise)
- A valid version of DataSync (refer to Installing DataSync for more information)
Configuring the Source Connections
You need to create four source connections:
-
A source connection that will be used for refreshing the data (for tables that can be loaded incrementally);
-
A source connection that will not incrementally refresh the data (for tables that cannot be loaded incrementally);
-
A source connection for user access (Security) so that Sage XRT Advanced users get created automatically in Nectari;
-
A source connection for the data warehouse that will be used for transforming currency rates into the proper format (in the CurrencyRateMaster table).
To create the Refresh source connection:
- In DataSync, create a new source connection.
- In the list, select Custom API.
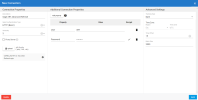
- In the Connection Properties panel:
- In the Description field, enter Refresh as the name for this connection.
- Select HTTP (Basic) as Authentication Type.
- Upload the CONN_2021R1.X.XXX_SXA Refresh.apip file.
-
In the Additional Connection Properties panel:
- Add a Visible property, name it User and assign it the value of your Sage XRT Advanced User.
- Add an Encrypted property, name it Password and assign it the value of your Sage XRT Advanced password.
-
In the Additional Settings panel, set the Tracking Type to Date.
-
Click Save.
To create the No Refresh source connection:
- In DataSync, create a new source connection.
- In the list, select Custom API.
- In the Connection Properties panel:
- In the Description field, enter No Refresh as the name for this connection.
- Select HTTP (Basic) as Authentication Type.
- Upload the CONN_2021R1.X.XXX_SXA NoRefresh.apip file.
-
In the Additional Connection Properties panel:
- Add a Visible property, name it User and assign it the value of your Sage XRT Advanced User.
- Add an Encrypted property, name it Password and assign it the value of your Sage XRT Advanced password.
-
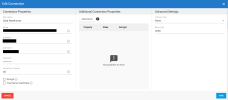
In the Additional Settings panel, leave the Tracking Type set to None.
-
Click Save.
To create the Security source connection:
- In DataSync, create a new source connection.
- In the list, select Custom API.
- In the Connection Properties panel:
- In the Description field, enter Security as the name for this connection.
- Select HTTP (Basic) as Authentication Type.
- Upload the CONN_2021R1.X.XXX_SXA Security.apip file.
-
In the Additional Connection Properties panel:
- Add a Visible property, name it User and assign it the value of your Sage XRT Advanced User.
- Add an Encrypted property, name it Password and assign it the value of your Sage XRT Advanced password.
-
In the Additional Settings panel, leave the Tracking Type set to None.
-
Click Save.
To create the Data Warehouse source connection:
- In DataSync, create a new source connection.
-
In the list, select SQL Server or Azure, depending on where the Nectari data warehouse is located.
-
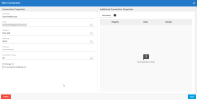
In the Connection Properties panel:
-
In the Description field, enter Data Warehouse as the name for this connection.
-
Enter the name of the server on which the database is installed.
-
Enter the name of the database to connect to.
-
Enter the user name and password.
-
-
In the Additional Settings panel, leave the Tracking Type set to None.
-
Click Save.
Configuring the Destination Connections
You need to create two destinations connections:
-
A destination connection for the Nectari Central Point. This connection will receive data from the Security source connection.
-
A destination connection for the Sage XRT Advanced Data Warehouse. This connection will receive data from the Refresh, No Refresh, and Data Warehouse source connections. This connection will use the same database settings as the Data Warehouse source connection.
To create the Central Point destination connection:
- In DataSync, create a new destination connection.
- Select the appropriate destination type.
-
In the Connection Properties panel:
-
In the Description field, enter Central Point as the name for this connection.
-
Enter the name of the server on which the database is installed.
-
Enter the name of the database to connect to.
-
Enter the user name and password.
-
-
Click Save.
To create the Data Warehouse destination connection:
- In DataSync, create a new destination connection.
- Select SQL Server or Azure, depending on where the Nectari data warehouse is located.
-
In the Connection Properties panel:
-
In the Description field, enter Data Warehouse as the name for this connection.
-
Enter the name of the server on which the database is installed.
-
Enter the name of the database to connect to.
-
Enter the user name and password.
-
-
Click Save.


