Acumatica Data Sync & Template
Use the following links to quickly jump to a section:
Introduction
To analyze data from Acumatica with Nectari, a few steps of configuration are required.
This
First, Nectari Data Sync for Acumatica will be installed to read the data and write it in a SQL Server database. Then, data from Acumatica will be made available to the synchronizer through OData general inquiries, installed by a customization project provided. Nectari Data Sync for Acumatica must be executed next. The Nectari templates will then be installed, providing ready-to-use Reports and Dashboards.
Prerequisites
The following are required before starting to use Nectari Data Sync for Acumatica:
- Acumatica 2018 R1/R2 or Acumatica 2019 R1/R2 is installed.
- The Collation SQL Instance must be set to SQL_Latin1_General_CP1_CI_AS (same as Acumatica SQL Instance if you are using a separate SQL Instance for Nectari Data Sync).
- If you are using Acumatica in HTTPS: ensure that you put a binding for Nectari Data Sync with a certificate approved by a Certificate Authority.
- If you have a custom identity on Acumatica Application Pool: ensure that you put the same one on the Application Pool of Nectari Data Sync.
Acumatica and Nectari are installed (refer to their respective installation guides).
A specific Acumatica ERP license is not required, only a Nectari license is.
Installation
This utility will read the data in OData and receive the Push Notifications.
IIS and .Net Framework 4.8 or later (included in the installation package) are required.
- On the server hosting IIS, run the executable provided with the product: Nectari Data Synchronizer for Acumatica.exe.
- You will first be prompted about administrator rights required to run the installer.
- On the Installation Welcome screen, click on Next.

- In the License Agreement screen, click on I accept the terms in the license agreement then on Next.

-
On the Website Configuration screen, click on Change… if you want to modify the installation location.
 Note
NoteLeaving it to the default value (which is in the default location of the IIS server) is recommended.
ImportantIf Acumatica uses an https connection, this tool must use https too. That configuration must be done manually in the IIS Bindings configuration after the installation.
You will need a certificate generated by a Certificate Authority.Additionally, if your ERP is hosted by the official Acumatica Cloud, you must configure your firewall to authorize only this range: 52.84.0.0 - 52.95.255.255 to access the server running the tool from outside your organization.


- Choose an available port for the website and click on Next.
- On the SQL Server Configuration screen, enter the database information:

- Database name: Choose a name for the database that will be used by the tool.
- SQL Server: Enter the server name and the SQL instance of this database. You can use Browse… to select it from a list of detected servers.
- Login ID and Password: Authenticate to an admin user of the database server.
- Click on Next.
- Click on Install when you are ready to install.

- When the installation is complete, click on Finish.Note
The default browser will automatically open on the utility tool that you need to configure at the next step.


- After installation you need to manually change your Application Pool settings of IIS:
- Go to IIS > Application Pool > AcumaticaDataSyncPool.
- Click on Recycling, and then click on Next.

- Untick the Configuration changes checkbox if necessary.


Configuration
The configuration of the Acumatica Data Synchronizer takes place on the web page opened at the end of the installation. It is the server on which it is installed and the chosen port. By default, it would be http://datasyncserver:82. The page consists of controls (explained later on) and a table containing the information for the data feeds.
- Click on Add new record and enter the following information:

- URL: Paste the URL of the system with ODATA at the end, server and instance only.
For example: http://acuserver/Acumatica/Odata. - Company: Enter the company/tenant name.
- MultiCompany: Untick the checkbox in this column if the system is not in a multi company / tenant setup.
- Username: Name of the Acumatica user with proper access rights. Usually "admin".
- Password: The password of that user.
- Active: Untick this checkbox to deactivate the data synchronization.
- URL: Paste the URL of the system with ODATA at the end, server and instance only.
-
Repeat
previous step for as many companies as required, as shown in the example below.

- Click on Save Changes to save the configuration in a securely encrypted internal database, and then go to the next step. Note
You cannot create the structure or/and load data until you import the project that will be done to the next step.


Execution
There are four possible actions for the tool. When doing the first installation, run only Initial Execution. In different contexts, you can use Data Refresh, Specific Refresh and Logs.
However, before doing these actions, you will need first to import a project in Acumatica ERP.
We highly recommend you to coordinate this step with your Acumatica ERP Consultant to avoid to accidentally unpublish others existing Projects.
When using Nectari Synchronizer for Acumatica for the first time, the database will be created and the inquiries starting with NEC will be read from OData and written into the SQL Server tables. This process can take time.
- Connect to Acumatica with a user with the proper access rights and navigate to Customization > Customization Projects.

- Click on Import and install the file Nectari2018RX.zip.
- Click on Save.
- Check the box on the new line Nectari2018RX.zip, and click on Publish.

Initial Execution
- Select All tables in the drop-down list (it is the default value).
- Click on Create Structure & Load Data or Create Structure if you plan to load the data later.
 Note
NoteWhen using this function, existing tables will first be dropped.

Data Refresh
Once the data from Acumatica has been taken during initial execution, it will be kept updated with the push notification system. No action is required.
- Navigate to Integration > Push Notifications and in the Destination Name field, display NECTARI_PUSH.

- Modify the address value by only changing the protocol, server name and port by the ones used by the application (refer to Configuration for more details).

- The rest of the address is static and is listed below (in case it gets deleted):


/api/webhooks/incoming/genericjson?code=83699ec7c1d794c0c780e49a5c72972590571fd8
When processing Push Notifications, an acknowledge signal gets back to Acumatica. The list of failed notifications will then be available in Acumatica for 48 hours (Integration > Process Push Notifications) where they can be sent again to be processed.
Specific Load Data
For maintenance purpose, it can be useful to pull all the data from a single inquiry / table or single company. In order to do so:
- Choose if you want to load All Tables or only one specific table.
- Choose if you want to load for All Companies or a specific Company.
Load for all companies / tenants
- Select the desired inquiry / table in the drop-down list.
- Click on Create Structure & Load Data.
Load for a specific company / tenant
- Ensure that the structure already exists or create it with Create Structure button (note that all data for all companies will be deleted).
- Select the desired inquiry / table in the drop-down list.
- Click on Load Data on the company row.


Logs
Whenever Nectari Synchronizer for Acumatica finds a problem, it will write it into the logs. To display the logged messages:
- Click on View Logs.
- Navigate through the list using the left or right arrows.
- Click on Details to show all available details regarding an issue.
- Or you can open the JSON file to read the log from a Text Editor (located in C:\inetpub\wwwroot\AcumaticaDataSync\App_Data).


Once the configuration is complete, you can now install the template in Nectari by following the sections Data Sources Configuration and Import Templates.
Upgrade Acumatica Data Sync
Before the upgrade:
- Perform a backup of Web.config located in C:\inetpub\wwwroot\AcumaticaDataSync (contains Data Sync DB details and website settings) and AcumaticaDataSynchronizer.sqlite located in C:\inetpub\wwwroot\AcumaticaDataSync\SQLiteDatabase (contains all companies configuration).
- Keep a screenshot of all Acumatica Data Sync (http and or https) IIS bindings, as you will probably need them for the reconfiguration.
- IF your Acumatica ERP is prior to version 19.200.0078, we highly recommend you to perform the upgrade when there is no ERP activity due to a bug in the reprocess of Process Push Notification.
- IF not, don't take this into account since this bug is fixed in higher version.
- Uninstall Nectari Data Sync for Acumatica.
- Force stop the Push Notifications:
- Connect to your Acumatica ERP.
- Go to Push Notifications and set a fake Webhook address to accumulate the potential Push Notifications being processed during that down time.
- Install the new package.
- Replace the file AcumaticaDataSynchronizer.sqlite.
- Copy paste the relevant settings in Web.config.
- Look at the screenshot you took earlier for the reconfiguration of your Acumatica Data Sync (http and or https) IIS bindings.
- Go to IIS > Application Pool > AcumaticaDataSyncPool.
- Click on Recycling, and then click on Next.
- Untick the Configuration changes checkbox if necessary.
- Restart AcumaticaDataSyncPool in IIS.
- Restart the Push Notifications by putting the real Webhook address back.
- Go back to the Process Push Notifications and for all companies verify if any Webhook have failed during the upgrade.
- If there is any, write down the impacted tables listed in the Source Name column as you will have to do a LoadAll on all of them via our Acumatica Data Sync.

- We highly recommend you to use the DELETE ALL feature to prevent processing these bad Webhooks.
If your Acumatica ERP is prior to version 19.200.0078:

If your Acumatica ERP is version 19.200.0078 or higher, you can force reprocessing those Webhooks by using the SEND ALL feature.
Data Sources Configuration
The Templates installation will provide you with a ready-to-use set of Views, Dashboards and Reports. Some Templates also provide Cubes.
Their installation (assuming the Central Point is freshly installed and empty), will consist of two steps:
- Configuring the Data Sources for the ERP and Data Warehouse (optional) databases.
- Importing the Templates into the Central Point.
- There may be other steps including building and loading the OLAP Cubes.
Environments and Data Sources
The description given to a Data Source created for the first time is used throughout the environments to describe this specific Data Source.
Give a generic description for the first time (e.g. ERP Data Source, Cube Data Source) and if necessary rename it after the first environment has been completed.
The following information is needed to configure the Data Sources:
- Database server credentials: Server name, Instance, Authentication strategy.
- Main ERP database information: Database and schema name.
ERP Data Source
- In the upper-right hand corner, click on the
 to access the Administration section.
- On the left pane, select Env. & Data Sources.
- By default, there is already an environment called Production,
which you can rename by double-clicking in the name box. Once changed, press the Enter
key.

- In the Data Sources section, click on
 Add to create the first Data Source.
- Complete the ERP Data Source configuration. See instructions for MS SQL Server below.


- Datasource description:
- Acumatica Data Source
- Type:
- SQLSERVER
- Server:
- Database server of Acumatica
- Database name:
- Name of the Acumatica
- Database schema name:
- Click on the icon to enter: AcumaticaSync.dbo (adjust the database name if different)
- Nectari schema:
- Enter the chosen Nectari custom schema for the current environment
- Authentication stategy:
- UseSpecific
- User Name:
- SQL User accessing the Acumatica
- Password:
- Password of the user.
- Click on Validate then on Save to complete the configuration of the Data Source.
Oracle Database
Instructions for MS SQL Server precede
- Datasource description:
- Acumatica Data Source
- Type:
- ORACLE
- Server:
- Name of the Oracle server
- SID and Port:
- SID and Port of the Acumatica database instance
- Database schema name:
- Create 2 entries by clicking on the + icon:
- dbo
- NEC_CUSTOM_SCHEMA
NoteThis second line contains the NectariCustom Schema.
You can use a different one, but we highly recommend following this naming convention:
- Start with NEC
- Use all capitals
- Separate words by underscore
ImportantChoose a uniqueCustom Schema name for each Environment.
- Nectari schema:
- Enter the chosen Nectari custom schema for the current environment.
- Authentication stategy:
- UseSpecific
- User Name:
- For example: system.
- Password:
- Password of the user.
- Click on Validate then on Save to complete the configuration of the Data Source.
Cube Data Source
In the same Environment as the ERP Data Source, create a new Data Source for the OLAP Cube.
Complete the Data Source Definition with all the appropriate information.
An example screenshot follows
- Server:
- Database server where the package: Nectari OLAP For SQL Server is installed.
- Database name:
- NectariCube.
- Database schema name:
- NectariCube.NEC_FOLDER (replace FOLDER by the folder name) .
- Where NEC_FOLDER (replace FOLDER by the folder name) is the schema used in the ERP Database of the same environment.
- Nectari schema:
- Enter the chosen custom schema for the current environment
- At this point, click on Validate then on Save.
- Click on Set as Data Warehouse to define the Data Source as a Data Warehouse then enter the following information:
- Database warehouse schema:
- Enter again the chosen Nectari custom schema
- Use MARS during the cube loading:
- Unchecked
- Click on Validate then on Save. Tip
Refer to Environments and Data Sources
Oracle Database
Instructions for MS SQL Server precede
- Server:
- Name of the database server where the Central Point is installed
- SID and Port:
- SID and Port of the Oracle database instance
- Pooling:
- Activating this option will improve performance (Refer to Environments and Data Sources
- Database schema name:
- NEC_CUSTOM_SCHEMA
- Where NEC_CUSTOM_SCHEMA is the custom schema used in the ERP database of the same environment
- Nectari schema:
- Enter the chosen Nectari custom schema for the current environment.
- Database warehouse schema:
- After saving the data source and set it as a data warehouse, enter the chosen Nectari custom schema for the current environment.
- Click on Validate then on Save to complete the configuration of the Data Source.
Import Templates
For each environment, the following previously configured information will be required:
- ERP Database Name
- Nectari Custom Schema
- ERP Schema
Download the Template file: TPL_9.X_Acumatica.zip.
The X represents the build number of the template (use the highest available).
Running the Import Template
- In the upper-right hand corner, click on the to access the Administration section.
- In the Administration section, click on the
 Templates drop-down menu in the left pane.
 - Select
 Import Template.
 - Choose the specific location where the new templates will be installed and click on Next.
 Note
NoteUsually, the Root folder is used.

- In the Import Template window, click on Select files....

- Browse to the folder where you saved the Template.zip file in order to select it then click on Open.
- In the Data Sources Mapping screen, associate the Data Sources (ERP) listed in the Received Data Sources Description column (those from the template) with the Data Sources you previously defined in the Central Point (listed in the Current Data Sources Description column)
- In the Received Data Sources Description column, only keep ticked the Data Sources checkboxes you want to use from the template.
- In the Current Data Sources Description column, click on Bind a Data Source to access the drop-down list containing the existing Data
Sources and click on Next.

In the next screen all the content of the Templates will be displayed, compared with what Central Point already has.
By default, on the first install, everything will be set as Add (leave everything by default) .
- In the case of a first installation, the first four columns will display None and Never Installed,
the next three will detail the Template content, and the last three gives you the choice to
Add, Update or Skip during the installation.Note
In the case of an update, you can refer to Update template for more details.
- Click on Next (this can take time).


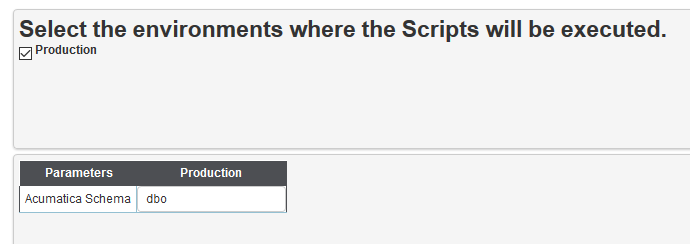
- Once this has been completed, a window will be prompted to input the necessary parameters to create the custom objects.
- If more than one Environment have been created, you will see a column per Environment.You can untick an Environment checkbox, in which case the Global Scripts will not run in it.
In the case of Acumatica, just enter dbo in as the Acumatica Schema and click on Next.
- After importing, an Execution Report will be produced, as shown below.Note
It has a first section for the ERP Data Source and a second one below for the Cube Data Source.
You can click on the
 button to see the details of each script individually. If no failures
are reported, close the window.
button to see the details of each script individually. If no failures
are reported, close the window.

- If any of the scripts failed to run, a fail icon
 will be displayed. Click on the fail symbol to
view the Report Preview window, which shows the respective SQL script.
will be displayed. Click on the fail symbol to
view the Report Preview window, which shows the respective SQL script.
- Copy this script,
debug, and run separately if needed. Users who are very proficient with SQL can debug it
straight in the Report Preview window and run it by clicking on the Try to rerun button.


You can now use Nectari with the ready-to-use reports.
The Universal Data Model (UDM) also has a set of Acumatica data sources that can be used (refer to Universal Data Model Configuration ).
Update template
Some considerations you must take into account before starting:
- It is highly recommended to make fresh backups of both the Nectari database and Central Point before doing a template update.
- It is highly recommended to check if customizations had not been done to Nectari Data Models or Nectari custom SQL objects that were delivered with the initial template version since those customizations might get lost with the update.
- You must have a template version that matches with the software version installed. If you are using Nectari 9, the template should be also 9.
When doing an upgrade of the Nectari software, it will only update the software and not the template. In other words, the existing Nectari Data Models and Views won't be affected.
After a software upgrade, it is not mandatory to systematically perform a template update. A template update is useful if you have encountered problems with specific Nectari Data Models or Nectari custom SQL objects as it includes fixes.
To update a template:
- After having mapped the Data sources, tick the checkboxes of the objects you want to upgrade an click on Next.
 Note
NoteBy default, no checkbox in the Update column will be ticked. If there is a new Data Model / View the Add checkbox will be ticked. Select Skip if you want to ignore it.
ImportantIf you tick the Update checkbox, it will overwrite the existing Nectari objects associated with that Data Model or connected to the others (dependencies). Please note that if any customizations have been done, they will be lost.

- Select the environment in which the scripts will be executed and click on Next.
- Complete the parameters and click on Next.
- In the Execution report window, If any of the scripts failed to run, a fail icon will be displayed. Click on the fail symbol to
view the Report Preview window, which shows the respective SQL script.
- Copy this script,
debug, and run separately if needed. Users who are very proficient with SQL can debug it
straight in the Report Preview window and run it by clicking on the Try to rerun button.
Building and Populating OLAP Cube
To create the Cubes database structure in the NectariCube database previously installed, you need to Build the Cube.
- In the upper right hand corner, click on the to access the Administration section.
- In the left pane, click on
 OLAP Manager.
 - In the right pane, click on
 Manage.
- In the left section, select all the Cubes to build by ticking the checkbox next to the Description column.
- In the Manage window , select Build in the Action drop-down list then the environment(s) and click Confirm.

- In the Confirmation window, tick the checkbox and click on Yes.

- If errors occur refer to Logs


Now that the Cubes are built, you can now populate them.
- In the right pane, click on Manage.
- In the left section, select all the Cubes to load by ticking the checkbox next to the Description column.
- In the Manage window , select Load All in the Action drop-down list then the environment(s) and click Confirm.

- In the Confirmation window, tick the checkbox and click on Yes.

The template installation is now complete.
Regular data refresh jobs for the Cubes can now be scheduled.
For this, you can refer to Scheduler
Uninstallation
To completely uninstall Nectari and Acumatica customizations for Nectari, proceed with the following steps:
- Uninstall the template in Nectari:
If Nectariwill be used in other contexts, skip this step. Otherwise:- Log in to Nectari as an admin user and navigate to Admin > Templates > Manage Templates.
- Click on Select All.
- If more than one template zip file was imported, review all object types (Data Models, Prompts, Dashboards etc) to make sure only the objects to be deleted are selected.
- Click on Uninstall.
- Uninstall Nectari Data Sync for Acumatica:
- Open the Apps & Features of the server.
- Find Nectari Data Synchronizer for Acumatica in the list of programs and click on Uninstall.
- Visit the installation folder to delete remaining Logs.
- Uninstall Acumatica Customizations:
- Log in to Acumatica with an admin user.
- Navigate to Customization > Customization Projects.
- Unselect the project Nectari2018RX.zip (do not select new lines) and click on Publish to unpublish the unselected project.
- Navigate to Customization > Generic Inquiry and remove all inquiries starting with NEC.
- Delete all site map in the path hidden/nectari sync (all objects start with NEC).
- Delete Push Notifications NECTARI_PUSH.