Users
- In the Administration section
, click on the
Security drop-down menu in the left pane.
- Select
Users.
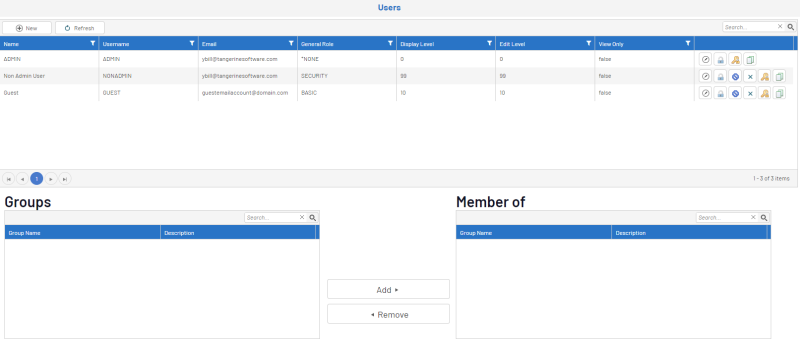
A list of users will be displayed with their detailed information.
The bottom
section will display the Groups that the selected user is a Member of.
Useful Icons:
- To unlock a user: click on
 .
.
- To deactivate a user: click on
 .
. - To reset and send the password to a user: click on
 .
.
- To copy an existing user: click on
 (the
(the  Paste New will appear in the top menu bar to
open the Edit window with all the definitions of the copied user.
)
Create New User
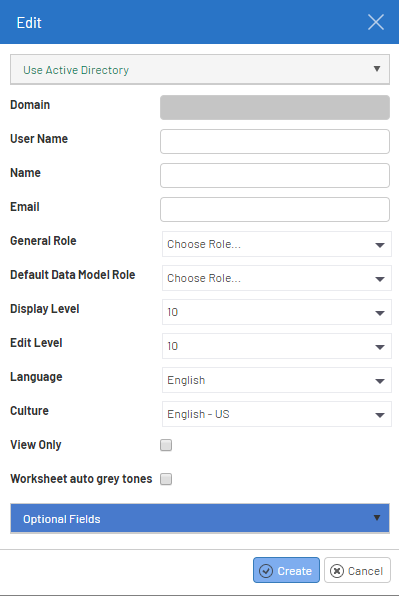
Use Active Directory
It is not mandatory to use the Active Directory. You have the choice between creating a regular user where the password will be maintained directly inside Nectari or to use an Active Directory where the password will be maintained in Windows.
If a Domain has been configured, select it with a user from the drop-down menu to create it. Otherwise, type in the name as required in each of these categories:
- Domain
- User Name
- Name
- General Role:
- Select a Role from the drop-down list. Please refer to Roles for more information.
- Default Data Model Role:
- Select a Role from the drop-down list. Please refer to Roles for more information. The role selected at this level will be used as the default role for a Data Model when we authorize the user to access a specific Data Model.
- Display Level:
- Choose the level of authorization required to view the columns of a Data Model. This will be the maximum level authorized for this user. Please refer to Data Model Designer for more information on how to change the columns display level.
- Edit Level:
- Select the level of authorization required to edit the columns of a Data Model. This will be the maximum level authorized for this user. Refer to Data Model Designer for more information on how to change the columns edit level.
- Language:
- The default language used in Nectari. The user can change the language as required. The language setting is also used by the distribution module when a massive distribution is done to multiple users to generate the result in their chosen language.
- Culture:
- The culture of the content of Nectari by default for this user. The user can change the culture in the user settings. The culture setting is also used by the distribution module when a massive distribution is done to multiple users to generate the result in the proper culture.
- View Only:
- Tick the checkbox to create the user as a viewer only.
- The Viewer Only can do everything as a normal user but save Views/Dashboards/Reports and Data Entries. It uses a different type of license.
Optional Fields:
Click the drop-down menu to display the Optional Fields.
They allow to fill 5 Optional Fields in the Nectari database. The table name is SEC_USER_SETTINGS and the fields are SET09, SET10, SET11, SET12 and SET13.
Once a New User has been created, that user will receive an email notifying that he has been added to the system and his security settings have been defined.

