Installing the Web Application and Distribution
- Run the application Nectari - Server - Win64.exe as an
administrator on the server or a user with sufficient rights to perform installations.Note
You might get a screen requiring you to install certain prerequisites, if they are not already installed on the server. Click on Install and they will be installed automatically.
- Click on Next.

- In the License Agreement screen, click on I accept the terms in the license agreement then on Next.

- Select Complete as the setup type to install all Nectari components or Custom to select only some
components to install and click on Next.

- Select which Nectari web applications you don’t want to install and mark them as such in the list and click on Next.

- In the Destination Folder screen, select the Installation Type and the User to use for all Services.
 Important
Multitenancy and/or Load Balancing installation should be made under the supervision of a Nectari expert.
NoteAnswering Yes to the question: Do you want to specify a user account for the services? allows the user to input a User for all Nectari services. Answering No installs with the general Windows profile.


- Specifying a User for the Services:
- If you selected Yes, in the previous screen, to the question: Do you want to specify
a user account for the Services?, you will be taken to the screen below. Enter
.\Administratoror the corresponding user with Admin privileges and the Windows password for the machine you are running the application Nectari - Server - Win64.exe. You must have proper user privileges for this process. If the account credentials are incorrect the Nectari installation will produce an error. Note
NoteIdeally, you should select a Windows user account whose password will not expire often (if at all), to avoid the service failing because the user credentials used to run it are expired. If you intend to use the Distribution Service to save the result of Views as files on the network, make sure that the Windows account entered at this step has the proper read/write access to the network locations where you decided to save the files.
- If you selected Yes, in the previous screen, to the question: Do you want to specify
a user account for the Services?, you will be taken to the screen below. Enter

-
- If you selected Multitenancy and/or Load Balancing: you will see the window below.
Indicate the Load Balancer URL for the Web Central Point Configurator Farm and click on Next.
 Note
NoteThe URL address entered in this window must be a private, internal URL address provided by your cloud service provider.
- If you selected Multitenancy and/or Load Balancing: you will see the window below.
Indicate the Load Balancer URL for the Web Central Point Configurator Farm and click on Next.

- Continuing with the Regular Installation type, you will see the window below. In the Path field enter the Central Point path.
- In the Name field, enter a name (i.e. the Company name) to be used on the Login screen of Nectari and click on Next.
 Note
NoteThe installation package does not validate the path, please ensure you enter the Central Point path that was used in the installation of the application Nectari Central Point for SQL Server.exe.
- Enter the Server Name and the Application Port to use.
- Select the Protocol used between the
Service and the Web Server.
 Important
Ensure that the port entered by default (4504) is not already being used by another website/application; if it is, select another available port. For a secure installation, the "SSL Configuration" section must have been done.
NoteIf you choose to use the server name, please make sure that when you ping it, an IP V4 address is returned. If an IP V6 address is returned, you should determine what the IP V4 address is for the server (in the example below you would type "ping YOURSERVER – 4" in a command window); and use the IP V4 address instead of the server name in the BI Server Address text box.
If the communication between the BI Service and the IIS web server has to be secured:
- The port must be already reserved
- The certificate already manually bound to it.
- The server name entered must match with the server of the certificate (do not enter
https://)Example
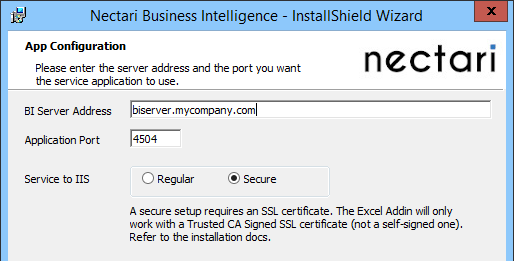 Note
NoteA self signed certificate will be sufficient, but the Excel Add-in will only connect to the server if the certificate is signed by a Certificate Authority.
More information on SSL and network commands in SSL Configuration.
- Enter the port to use for the Application Website and determine if the authentication of the users
will go through a Single Sign-On (SSO)
service.

If choosing to setup SAML2 Single Sign-on, new fields will display:
- SEI Issuer URI:
- Enter the Entity Id. It is the URI used to define Nectari application with the service provider.
- SAML2 answer’s Attribute for user name:
- Enter the answer attribute containing the user name.
- ID Provider Issuer Name:
- Enter the IDP name.
- ID Provider URL:
- Enter the IDP URL.
- Full certificate name:
- To use a certificate, it has to be placed in the folder C:\inetpub\wwwroot\WebClient\App_Data and its full name including extention written here.
NoteMore information is given about the SSO configuration in Single Sign-On (SSO).
If you are using Azure Domain Active Directory (AD), refer to Azure Single Sign-On for more details.
- Click on Next.
- Click on Install.

- Once the installation is complete, click on Finish.


