Universal Data Model
Introduction
The Templates installation provides you with a ready-to-use set of Views, Dashboards and Reports.
The installation (assuming the Central Point is freshly installed and empty), will consist of two steps:
- Configuring the Data Sources for the ERP and Data Warehouse (optional) databases.
- Importing the Templates into the Central Point.
There may be other steps including building and loading the OLAP Cubes.
Data Source Configuration
You must configure one Data Source per ERP system used, and one for the OLAP cubes.
Please refer to the ERP’s template documentation to configure them.
Environments and Data Sources
The description given to a Data Source created for the first time is used throughout the environments to describe this specific Data Source.
Give a generic description for the first time (e.g. ERP Data Source, Cube Data Source) and if necessary, rename it after the first environment has been created.
The following information is needed to configure the Data Sources:
- Database server credentials: Server name, Instance, Authentication strategy.
- Main ERP database information: Database and schema name.
ERP Data Source
- In the upper-right hand corner, click on the
 to access the Administration section.
- On the left pane, select Env. & Data Sources.
- By default, there is already an environment called Production,
which you can rename by double-clicking in the name box. Once changed, press the Enter
key.

- In the Data Sources section, click on
 Add to create the first Data Source.
- Complete the ERP Data Source configuration. See instructions for MS SQL Server


Oracle instructions follow

- Datasource description:
- Universal Data Model Data Source
- Type:
- SQLSERVER
- Server:
- Database server of Universal Data Model
- Database name:
- Name of the Universal Data Model database (beware of the case sensitivity)
- Database schema name:
- Create the two following entries by clicking on the icon (replace DatabaseName by the appropriate value):
- DatabaseName.dbo
- DatabaseName.NEC_CUSTOM_SCHEMA
NoteThis second line contains the Nectari Custom Schema.
You can use a different one, but we highly recommend following this naming convention:
- Start with NEC
- Use all capitals
- Separate words by an underscore
ImportantChoose a unique Custom Schema name for each Environment.
- Nectari schema:
- Enter the chosen Nectari custom schema for the current environment
- Authentication stategy:
- UseSpecific
- User Name:
- SQL User accessing the Universal Data Model database. For example, sa.
- Password:
- The user's password.
- Click on Validate then on Save to complete the configuration of the Data Source.
For Oracle Database
- Datasource description:
- Universal Data Model Data Source
- Type:
- ORACLE
- Server:
- Name of the Oracle server
- SID and Port:
- SID and Port of the Universal Data Model database instance
- Database schema name:
- Create 2 entries by clicking on the + icon:
- dbo
- NEC_CUSTOM_SCHEMA
This second line contains the NectariCustom Schema.
You can use a different one, but we highly recommend following this naming convention:
- Start with NEC
- Use all capitals
- Separate words by underscore
Choose a unique Custom Schema name for each Environment.
- Nectari schema:
- Enter the chosen Nectari custom schema for the current environment.
- Authentication stategy:
- UseSpecific
- User Name:
- For example: system.
- Password:
- Password of the user.
- Click on Validate then on Save to complete the configuration of the Data Source.
Cube Data Source
In the same Environment as the ERP Data Source, create a new Data Source for the OLAP Cube.
Complete the Data Source Definition with all the appropriate information.
Oracle instructions follow
The screenshot below provides an example of this.

- Server:
- Database server where the Nectari OLAP For SQL Server package is installed.
- Database name:
- NectariCube.
- Database schema name:
- NectariCube.NEC_FOLDER (replace FOLDER by the folder name).
- Where NEC_FOLDER (replace FOLDER by the folder name) is the schema used in the ERP Database of the same environment.
- Nectari schema:
- Enter the chosen custom schema for the current environment
- Click on Validate then on Save.
- Click on Set as Data Warehouse to define the Data Source as a Data Warehouse then enter the following information:
- Database warehouse schema:
- Enter the chosen Nectari custom schema again.
- Use MARS during the cube loading:
- Unchecked
- Click on Validate then on Save.
Refer to Environments and Data Sources for more details about the MARS option .
For Oracle Database
- Server:
- Name of the database server where the Central Point is installed
- SID and Port:
- SID and Port of the Oracle database instance
- Pooling:
- Activating this option will improve performance (Refer to Environments and Data Sources for more details).
- Database schema name:
- NEC_CUSTOM_SCHEMA
- Where NEC_CUSTOM_SCHEMA is the custom schema used in the ERP database of the same environment
- Nectari schema:
- Enter the chosen Nectari custom schema for the current environment.
- Database warehouse schema:
- After saving the data source and set it as a data warehouse, enter the chosen Nectari custom schema for the current environment.
- Click on Validate then on Save to complete the configuration of the Data Source.
Importing Templates
For each environment, the following previously configured information will be required:
- ERP Database Name
- Nectari Custom Schema
- ERP Schema
Download the Template file: TPL_9.5.XXX_UDM_FINANCE.zip.
The X represents the build number of the template (use the highest available).
Running the Import Template
- In the upper-right hand corner, click on the to access the Administration section.
- In the Administration section, click on the
 Templates drop-down menu in the left pane.
 - Select
 Import Template.
 - Choose the specific location where the new templates will be installed and click on Next.
 Note
NoteUsually, the Root folder is used.

- In the Import Template window, click on Select files....

- Find the folder where you saved the Template.zip file in order to select it then click on Open.
- In the Data Sources Mapping screen, associate the Data Sources (ERP) listed in the Received Data Sources Description column (those from the template) with the Data Sources you previously defined in the Central Point (listed in the Current Data Sources Description column)
- In the Received Data Sources Description column, ensure that only the Data Sources checkboxes you want to use from the template are ticked off.
- In the Current Data Sources Description column, click on Bind a Data Source to access the drop-down list containing the existing Data
Sources and click on Next.


The Universal Data Model template is based on OLAP Cubes. You must map the Data Source OLAP Datasource to make use of the template, then, associate the other ERP Data Sources.
For Sage Enterprise Management, you must install two data sources: 1) the Generic part, and 2) the version specific data source (either Sage Enterprise Management/V6-V10 or Sage Enterprise Management V11).
In the next screen all of the Templates content is displayed, against what the Central Point already has.
By default, on the first install, everything will be set to Add (leave everything by default) .
- In the case of a first installation, the first four columns will display None and Never Installed,
the next three will detail the Template content, and the last three gives you the choice to
Add, Update or Skip during the installation.Note
In the case of an update, you can refer to Updating template for more details.
- If ERP templates were installed already, some items will display Update or Skip, because they are shared in different templates. Keep the default values.
- Click on Next (this can take time).


- Once this has been completed, a window will be prompted to input the necessary parameters to create the custom objects.
- If more than one Environment have been created, you will see a column per Environment. You can untick an Environment checkbox, in which case the Global Scripts will not run in it.
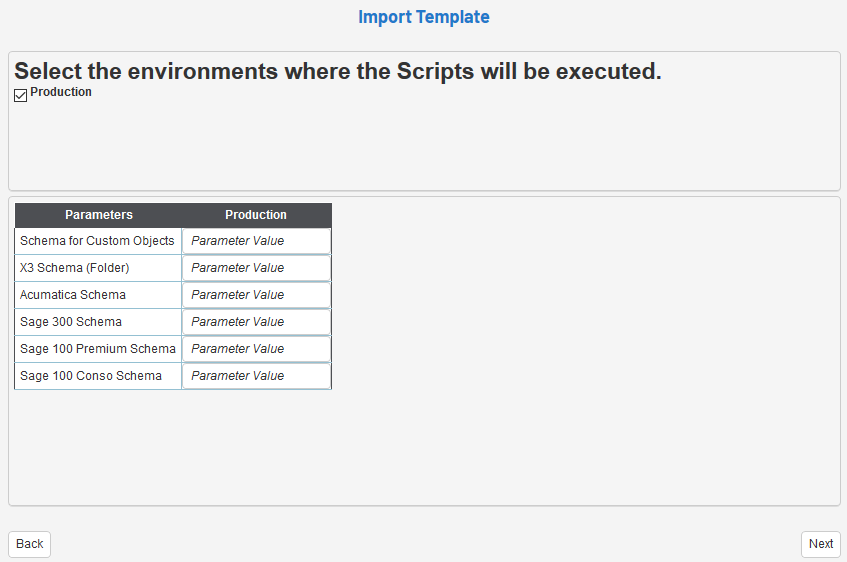
- Complete the parameters, see examples below, and click on Next.
Oracle

- After importing, an Execution Report will be produced, as shown below.Note
The first section is for the ERP Data Source and the one below it is for the Cube Data Source.
You can click on the
 button to see the details of each script individually. If no failures
are reported, close the window.
button to see the details of each script individually. If no failures
are reported, close the window.

- If any of the scripts failed to run, a fail icon
 will be displayed. Click on the fail symbol to
view the Report Preview window, which shows the respective SQL script.
will be displayed. Click on the fail symbol to
view the Report Preview window, which shows the respective SQL script.
- Copy this script,
debug, and run it separately if needed. Users who are proficient with SQL can debug it
straight in the Report Preview window and run it by clicking on the Try to rerun button.


Updating template
Some considerations you must take into account before starting:
- Making fresh backups of both the Nectari database and Central Point before doing a template update is highly recommended.
- Check the Nectari Data Models and Nectari custom SQL objects that may have been delivered with the initial template version, as you might lose these customizations upon updating.
- You must have a template version that matches the software version installed. If you are using Nectari 9, the template should be also 9.
When performing an upgrade of the Nectari software, it will only update the software and not the template. In other words, the existing Nectari Data Models and Views won't be affected.
After a software upgrade, it is not mandatory to systematically perform a template update. A template update is useful if you have encountered problems with specific Nectari Data Models or Nectari custom SQL objects as it includes fixes.
To update a template:
- After having mapped the Data sources, tick the checkboxes of the objects you want to upgrade and click on Next.
 Note
NoteBy default, no checkbox in the Update column will be ticked. If there is a new Data Model / View the Add checkbox will be ticked. Select Skip if you want to ignore it.
ImportantIf you tick the Update checkbox, it will overwrite the existing Nectari objects associated with that Data Model or connected to the others (dependencies). Please note that if any customizations have been done, they will be lost.

- Select the environment in which the scripts will be executed and click on Next.
- Complete the parameters and click on Next.
- In the Execution report window, If any of the scripts failed to run, a fail icon will be displayed. Click on the fail symbol to
view the Report Preview window, which shows the respective SQL script.
- Copy this script,
debug, and run it separately if needed. Users who are proficient with SQL can debug it
straight in the Report Preview window and run it by clicking on the Try to rerun button.
Web Browsers have updated their policy regarding Cookies and these changes must be applied to your Web Client if you want Nectari embedded into your ERP website, or use Single Sign-On (SSO). Refer to Cookie Management for more details.
Adding the Thai language
The Thai language is not available by default, so it must be added to the Nectari environment to be available in the template.
- Refer to Languages to create this language in the list.
- Fill in the window as indicated and click on Create to finish.


Using the Universal Data Model template
Once the Template is installed, please refer to Configuration Specific to Each System to proceed with the configuration.