Sage X3
Introduction
The Templates installation provides you with a ready-to-use set of Views, Dashboards and Reports.
The installation (assuming the Central Point is freshly installed and empty), will consist of two steps:
- Configuring the Data Sources for the ERP and Data Warehouse (optional) databases.
- Importing the Templates into the Central Point.
There may be other steps including building and loading the OLAP Cubes.
Data Source Configuration
Environments and Data Sources
The description given to a Data Source created for the first time is used throughout the environments to describe this specific Data Source.
Give a generic description for the first time (e.g. ERP Data Source, Cube Data Source) and if necessary, rename it after the first environment has been created.
The following information is needed to configure the Data Sources:
- Database server credentials: Server name, Instance, Authentication strategy.
- Main ERP database information: Database and schema name.
ERP Data Source
- In the upper-right hand corner, click on the
 to access the Administration section.
- On the left pane, select Env. & Data Sources.
- By default, there is already an environment called Production,
which you can rename by double-clicking in the name box. Once changed, press the Enter
key.

- In the Data Sources section, click on
 Add to create the first Data Source.
- Complete the ERP Data Source configuration. See instructions for MS SQL Server


Microsoft SQL Server
Oracle instructions follow

- Datasource description:
- Sage X3 Data Source
- Type:
- SQLSERVER
- Server:
- Database server of Sage X3
- Database name:
- Name of the Sage X3 database (beware of the case sensitivity)
- Database schema name:
- Create the two following entries by clicking on the icon (replace DatabaseName by the appropriate value):
- DatabaseName.FOLDER (replace FOLDER by the folder name)
- DatabaseName.NEC_FOLDER (replace FOLDER by the folder name)
NoteThis second line contains the Nectari Custom Schema.
You can use a different one, but we highly recommend following this naming convention:
- Start with NEC
- Use all capitals
- Separate words by an underscore
ImportantChoose a unique Custom Schema name for each Environment.
- Nectari schema:
- Enter the chosen Nectari custom schema for the current environment
- Authentication stategy:
- UseSpecific
- User Name:
- SQL User accessing the Sage X3 database. For example, sa.
- Password:
- The user's password.
- Click on Validate then on Save to complete the configuration of the Data Source.
For Oracle Database

- Datasource description:
- Sage X3 Data Source
- Type:
- ORACLE
- Server:
- Name of the Oracle server
- SID and Port:
- SID and Port of the Sage X3 database instance
- Database schema name:
- Create 2 entries by clicking on the + icon:
- FOLDER (replace FOLDER by the folder name)
- NEC_FOLDER (replace FOLDER by the folder name)
This second line contains the NectariCustom Schema.
You can use a different one, but we highly recommend following this naming convention:
- Start with NEC
- Use all capitals
- Separate words by underscore
Choose a unique Custom Schema name for each Environment.
- Nectari schema:
- Enter the chosen Nectari custom schema for the current environment.
- Authentication stategy:
- UseSpecific
- User Name:
- For example: system.
- Password:
- Password of the user.
- Click on Validate then on Save to complete the configuration of the Data Source.
Cube Data Source
In the same Environment as the ERP Data Source, create a new Data Source for the OLAP Cube.
Complete the Data Source Definition with all the appropriate information.
Microsoft SQL Server
Oracle instructions follow
The screenshot below provides an example of this.

- Server:
- Database server where the Nectari OLAP For SQL Server package is installed.
- Database name:
- NectariCube.
- Database schema name:
- NectariCube.NEC_FOLDER (replace FOLDER by the folder name).
- Where NEC_FOLDER (replace FOLDER by the folder name) is the schema used in the ERP Database of the same environment.
- Nectari schema:
- Enter the chosen custom schema for the current environment
- Click on Validate then on Save.
- Click on Set as Data Warehouse to define the Data Source as a Data Warehouse then enter the following information:
- Database warehouse schema:
- Enter the chosen Nectari custom schema again.
- Use MARS during the cube loading:
- Unchecked
- Click on Validate then on Save.
Refer to Environments and Data Sources for more details about the MARS option .
For Oracle Database

- Server:
- Name of the database server where the Central Point is installed
- SID and Port:
- SID and Port of the Oracle database instance
- Pooling:
- Activating this option will improve performance (Refer to Environments and Data Sources for more details).
- Database schema name:
- NEC_FOLDER (replace FOLDER by the folder name)
- Where NEC_FOLDER (replace FOLDER by the folder name) is the custom schema used in the ERP database of the same environment
- Nectari schema:
- Enter the chosen Nectari custom schema for the current environment.
- Database warehouse schema:
- After saving the data source and set it as a data warehouse, enter the chosen Nectari custom schema for the current environment.
- Click on Validate then on Save to complete the configuration of the Data Source.
Importing Templates
For each environment, the following previously configured information will be required:
- ERP Database Name
- Nectari Custom Schema
- ERP Schema
Note
If you want to manage the Budget in Nectari, you can attach up to 10 budgets in the Finance Cube. Budget Number will be equal to the Budget Code, its corresponding version will be Budget Number Version.
Download the Template file: TPL_9.5.XXX_SageX3.zip.
The X represents the build number of the template (use the highest available).
Running the Import Template
- In the upper-right hand corner, click on the to access the Administration section.
- In the Administration section, click on the
 Templates drop-down menu in the left pane.
 - Select
 Import Template.
 - Choose the specific location where the new templates will be installed and click on Next.
 Note
NoteUsually, the Root folder is used.

- In the Import Template window, click on Select files....

- Find the folder where you saved the Template.zip file in order to select it then click on Open.
- In the Data Sources Mapping screen, associate the Data Sources (ERP) listed in the Received Data Sources Description column (those from the template) with the Data Sources you previously defined in the Central Point (listed in the Current Data Sources Description column)
- In the Received Data Sources Description column, ensure that only the Data Sources checkboxes you want to use from the template are ticked off.
- In the Current Data Sources Description column, click on Bind a Data Source to access the drop-down list containing the existing Data
Sources and click on Next.

In the next screen all of the Templates content is displayed, against what the Central Point already has.
By default, on the first install, everything will be set to Add (leave everything by default) .
- In the case of a first installation, the first four columns will display None and Never Installed,
the next three will detail the Template content, and the last three gives you the choice to
Add, Update or Skip during the installation.Note
In the case of an update, you can refer to Updating template for more details.
- Click on Next (this can take time).


- Once this has been completed, a window will be prompted to input the necessary parameters to create the custom objects.
- If more than one Environment have been created, you will see a column per Environment. You can untick an Environment checkbox, in which case the Global Scripts will not run in it.

The Global Currency parameter calculates the exchange rates from all currencies that exist in the exchange rate table to the currency you define. It must exist in the exchange rate table on a day to day basis to improve the performance of Joins and to be able to convert all documents from any companies to the defined currency in some reports. Those reports usually have Global Currency in the worksheet name.
- Complete the parameters, see examples below, and click on Next.
SQL Server

- After importing, an Execution Report will be produced, as shown below.Note
The first section is for the ERP Data Source and the one below it is for the Cube Data Source.
You can click on the
 button to see the details of each script individually. If no failures
are reported, close the window.
button to see the details of each script individually. If no failures
are reported, close the window.

- If any of the scripts failed to run, a fail icon
 will be displayed. Click on the fail symbol to
view the Report Preview window, which shows the respective SQL script.
will be displayed. Click on the fail symbol to
view the Report Preview window, which shows the respective SQL script.
- Copy this script,
debug, and run it separately if needed. Users who are proficient with SQL can debug it
straight in the Report Preview window and run it by clicking on the Try to rerun button.


Updating template
Some considerations you must take into account before starting:
- Making fresh backups of both the Nectari database and Central Point before doing a template update is highly recommended.
- Check the Nectari Data Models and Nectari custom SQL objects that may have been delivered with the initial template version, as you might lose these customizations upon updating.
- You must have a template version that matches the software version installed. If you are using Nectari 9, the template should be also 9.
When performing an upgrade of the Nectari software, it will only update the software and not the template. In other words, the existing Nectari Data Models and Views won't be affected.
After a software upgrade, it is not mandatory to systematically perform a template update. A template update is useful if you have encountered problems with specific Nectari Data Models or Nectari custom SQL objects as it includes fixes.
To update a template:
- After having mapped the Data sources, tick the checkboxes of the objects you want to upgrade and click on Next.
 Note
NoteBy default, no checkbox in the Update column will be ticked. If there is a new Data Model / View the Add checkbox will be ticked. Select Skip if you want to ignore it.
ImportantIf you tick the Update checkbox, it will overwrite the existing Nectari objects associated with that Data Model or connected to the others (dependencies). Please note that if any customizations have been done, they will be lost.

- Select the environment in which the scripts will be executed and click on Next.
- Complete the parameters and click on Next.
- In the Execution report window, If any of the scripts failed to run, a fail icon will be displayed. Click on the fail symbol to
view the Report Preview window, which shows the respective SQL script.
- Copy this script,
debug, and run it separately if needed. Users who are proficient with SQL can debug it
straight in the Report Preview window and run it by clicking on the Try to rerun button.
Building and Loading the OLAP Cubes
To create the Cubes database structure in the NectariCube database previously installed, you need to Build the Cube.
- In the upper right-hand corner, click on the to access the Administration section.
- In the left pane, click on
 OLAP Manager.
 - In the right pane, click on
 Manage.
- In the left section, select all the Cubes to build by ticking the checkbox next to the Description column.
- In the Manage window, select Build in the Action drop-down list then the environment(s) and click Confirm.

- In the Confirmation window, tick the checkbox and click on Yes.

- If errors occur refer to Logs to activate the logging feature.


Now that the Cubes are built, you can now populate them.
- In the right pane, click on Manage.
- In the left section, select all the Cubes to load by ticking the checkbox next to the Description column.
- In the Manage window, select Load All in the Action drop-down list then the environment(s) and click Confirm.

- In the Confirmation window, tick the checkbox and click on Yes.

The template installation is now complete.
Regular data refresh jobs for the Cubes can now be scheduled. For more details on how to do this, refer to Scheduler.
Embed into Sage X3
This feature has been available since Sage X3 v7. There are two ways to integrate Nectari Views.
The traditional/simple way is to take the Nectari URL component and use it in Sage X3.
Use the complete URL as found in Identify the Environment and add it as a widget in Sage X3 (refer to Sage documentation).
The advanced integration allows filtering of Nectari Views according to the active field in Sage X3.
To use this functionality, a patch must be applied.
In every case, you must make adjustments to Syracuse (refer to Adjustment for Syracuse and Adjustment for Internet Explorer 11/Edge) to post the Nectari elements in Sage X3.
Web Browsers have updated their policy regarding Cookies and these changes must be applied to your Web Client if you want Nectari embedded into your ERP website, or use Single Sign-On (SSO). Refer to Cookie Management for more details.
Prepare the Sage X3 server
Adjustment for Syracuse
Starting from X3U9P4 only.
- Open the file nodelocal.js with a text editor (Notepad, Notepad++). The default path for this file is: C:\sage\syracuse\syracuse\bin
- After the tag, add: x3fusion and the following content (do not forget the initial comma) change the webapplication address in "child-src".
,
                security:{
                "http": {
                        // HTTP headers added
                        "headers": {
                                "content-security-policy": {
                                         "child-src": [
                                                "'self'",
                                                "https://biprod.yourcompany.com:444","https://bidev.yourcompany.com:444"
                                         ]
                                },
                        }
                },
                "client": {
                        "iframe": {
                                "sandbox": {
                                        // The html vignettes allow 3 levels of security ('low', 'medium' and 'high') for sandboxing iframes
                                        "low": "allow-same-origin allow-forms allow-scripts allow-downloads allow-popups",
                                        "medium": "allow-same-origin allow-forms allow-scripts allow-downloads allow-popups",
                                        "high": "allow-same-origin allow-forms allow-scripts allow-downloads allow-popups"
                                }
                        }
                }
        }
Adjustment for Internet Explorer 11/Edge
This step is optional, but the Nectari components will not be able to display in IE11/Edge without it.
- Open the file main.html with a text editor (Notepad, Notepad++). The default path for this file is: C:\sage\syracuse\syracuse\bin\node_modules\syracuse-main\html
- Replace IE=10 with IE=edge.


Install the Patch
The following steps are given as a guide only and should be supervised by a Sage X3 expert.
- Connect to the X3 folder and navigate to: Development > Utilities > Patch integration (PATCH).
- Choose the type of destination client, if the patch file is accessible from the work station.
- Tick the Patch Integration checkbox .
- In the Folder list, leave only the files that are required for the patch installation.
 Note
NoteInstalling it in the X3 folder is not required.

- Click on OK, choose the pth_ZBITG_XXXXXXXX_VX.dat and scr_ZURLMAKER_XXXXXXXX_VX.dat files, then click on OK again to complete the patch installation.
Identify the Environment
This information is necessary for the section Adjust the Nectari parameters in Sage X3 and is found here:
- In Nectari, go to the desired Environment and open any View.

- In the Settings menu (right panel), click on
 and select View External Link.
 - In the new external link URL, read the value of envID in the URL and copy it to use in the
next step.


Adjust the Nectari parameters in Sage X3
- Go to the Sage X3 parameters: Setup > General Parameters > Parameter Values > SUP
- In all the folders where this is required, modify in DEF (default value) the following two parameters (installed by the patch):
| Parameter | Description |
Value |
|
|
|
|
| ZBIURLEID | BI Environment ID |
The environment identifier associated with the Sage X3 folder (obtained in the previous step). |
| ZBIURLSRV | BI Web URL |
The URL used to connect to Nectari. |
Configure the filter in the screen
The patch is supplied with 2 screens ready to be used and serves as the base to copy for the different possible filters:
- ZBITGEX:
- ZBITGEXA: filter the client on [M:BPC0]BPCNUM
Action Parameters
- ZURLDES
- Value sent to ZURLMAKER. (no change)
- ZURLFLD*
- Identifies Nectari in the field used for the filter (Table.field).
- ZURLKEY*
- Identifies Sage X3 in the corresponding filed serving the filter ([mask]field).
- ZURLPID
- Identifies the Nectari Data Model.
- ZURLVID
- Identifies the Nectari View.
ZURLPID and ZURLVID are found in the following steps with the same ID environment as described in Identify the Environment. The parameters to recuperate the URL are respectively PID and VID.

Adding a tab in a Sage X3 window
The following steps are given for information only and should be supervised by a Sage X3 expert.
The screen must be added to a window to be visible. For example, to add a tab in the Customers window:
- In the window (Development > Script dictionary > Window management), identify the Customers window (OBPC).
- In the screen tab, under the tab, add a line in the screen ZBITGEXA.


Configuring the Finished Products Global Variable
The Finished Products Global Variable is used to calculate the Sold Products value (CMV/COGS) and the Inventory.
- In the upper right hand corner, click on the to access the Administration section.
- In the left pane, click on
 Global Variables.
 - Edit the @@FINISHED_PROD_GROUP global variable by changing the value by the category code
from the appropriate X3 product category.


Configuring the Finance Open Balance
In order to get the Opening Balance from the Finance cube, you will need to run the Nectari GL Opening Balance from the GL Transaction Details Data Model.
In order to do so:
- Make sure the data sources are activated before loading the cubes:
- In the upper right-hand corner, click on the to access the Administration section.
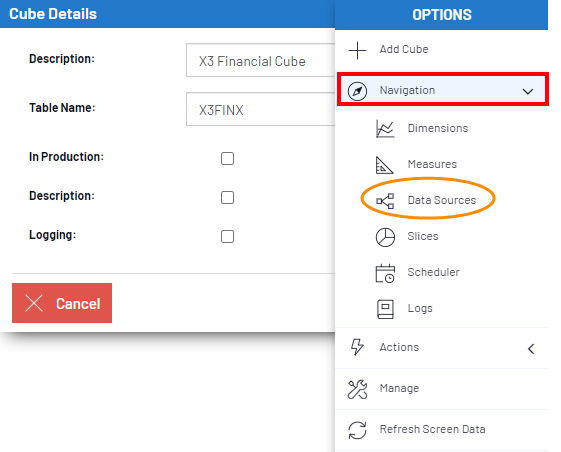
- On the left pane, click on OLAP Manager.
- In the list, select X3 Financial Cube,click on
 Navigation and select
  Data Sources.
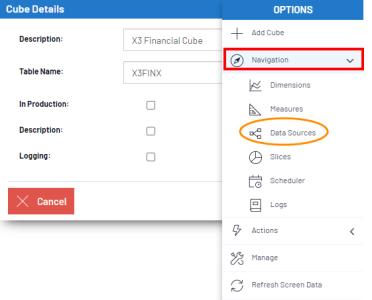
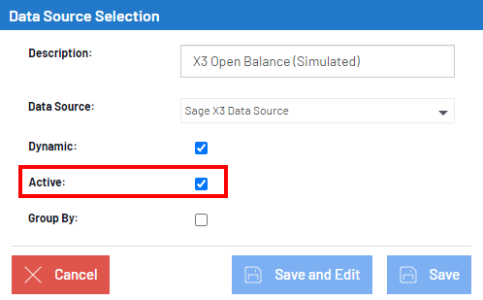
- Select X3 Open Balance (Simulated) and X3 Open Balance (Simulated) LY and make sure their Active checkbox is ticked. If not, tick the Active checkbox and click on Save.
- In the upper right-hand corner, click on the
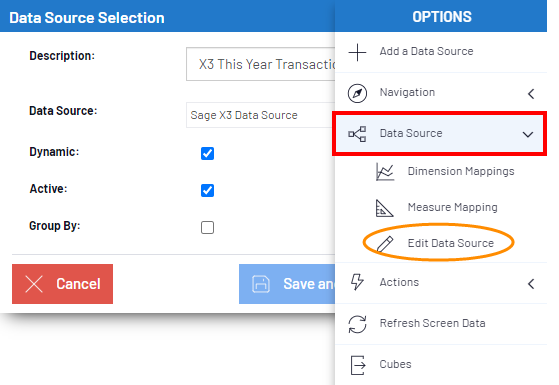
- Make sure that closed year amount will not be loaded and duplicated in the cube:
- In the list, select X3 This Year Transactions, click on Data Source and choose Edit Data Source .

- The following WHERE statement must be applied. Remove the comment section (“/*” and “*/”) in the red box.

- In OLAP Manager, select and load the X3 Financial Cube.
- In the list, select X3 This Year Transactions, click on
- From the Data Model and Views tab, in the Finance folder, right-click on one GL Transaction Details and select View Info Pages.
- In the From and To fields, enter the beginning of the fiscal year and the last fiscal year for which you want to run the Opening Balance and click on Calculate Open Balance depending on the server you are using (SQL or Oracle).


Update the Global Currency Rates
Many Data Models belonging to the standard Nectari Template return amounts that have been converted to the global currency of the company. This conversion is done by using a rate stored in a custom table (ZTABCHANGE), which is created automatically when running the Global Scripts during the Template Import.
This table needs to be populated with currency conversion rates on a regular basis.
Setting up an automatic job in the SQL Server agent is recommended.
Setup on a SQL Server
The script needed for this job to run can be obtained by going into the X3 Database in SQL Server Management Studio and executing the ZREFCNVRATES stored procedure, found under the Programmability, Stored Procedures section of the X3 database, and under each custom schema created during the Template Import.
Below is an example of the resulting script which was run in an X3 database, in a custom NEC_SEED schema.
You can use this script, provided that you replace NEC_SEED by the appropriate custom schema name for your installation.
You should have one SQL Server Agent Job for each custom schema you created during the Template Import process (making sure that each job executes a script which contains the proper respective custom schema name in the call of the ZREFCNVRATES stored procedure).
	USE [x3]
	GO
		EXEC	[NEC_SEED].[ZREFCNVRATES] 'USD'
Where NEC_SEED is the custom schema for Nectari, x3 is the ERP database, and USD is your global currency.
Setup on an Oracle Server
You can create a new Oracle job which runs a script similar to the following.
Below is an example of a script which is meant to be run in the X3 Database, in a custom NEC_SEED schema and launches the ZREFCNVRATES procedure.
You can use this script, provided that you replace NEC_SEED by the appropriate custom schema name for your installation.
You should have one job for each custom schema you created during the Template Import procedure.
	BEGIN
		NEC_SEED.ZREFCNVRATES('USD');
	END;
Where NEC_SEED is the custom schema for Nectari and USD is your global currency.
Updating the Global Currency rates manually
You can also update the currency conversion rates manually from Nectari.
- From the Data Models and Views tab, right-click on the Global Currency Rates (Consolidation) Data Model and select View Info
Pages.

- Depending on the Central Point database type (SQL Server or Oracle), click on Update internal currency exchange rates.


Create an SQL Job to update the Global Currency rates
Scheduling a job to refresh the Global Currency rates on a regular basis is recommended.
- The frequency should be agreed upon with the client. A good example would be to let the job run on a daily basis, after office hours.
- Below are examples for SQL and Oracle. Repeat this step for each defined Environment.
SQL:
On an SQL server, create an SQL Job with SQL Server Agent.
Below is a script you can use as reference in the SQL Job definition. You will need to replace X3v6 with the name of your Sage X3 ERP database, and NEC_SEED by the name of the Nectari Custom Schema specified in the X3 data source.
USE [x3]
GO
	EXEC	[NEC_SEED].[ZREFCNVRATES] 'USD'
ORACLE:
An example of the Oracle command for rebuilding the currency rate table is specified below.
You will need to replace CUSTOM_SCHEMA by the name of the Nectari Custom Schema (in Oracle also known as a User) specified in the X3 data source.
	BEGIN
		CUSTOM_SCHEMA.ZREFCNVRATES ('USD');
	END;
Update the Internal Dictionary
To import the description of Sage X3 Tables and Fields for a better experience in the Data Model Designer, follow these steps:
- In the upper right-hand corner, click on the to access the Administration section.
- In the left pane, click on
 Mapping Language Dictionaries.
The first four lines refer to scripts to be executed if your ERP Data Source points to an SQL Server database.

If your ERP Data Source points to an Oracle database, you should use the next four scripts. The beginning of the script will be displayed.

- Execute the script to map the language codes by clicking on
 next to each
script line.
next to each
script line. -
Map the language codes of Nectari with the language codes of your ERP (case-sensitive).
NoteFor example, in Nectari, the English code is defined as “en” when in the ERP it could be “ENG”. Click Next.

- Map the dictionaries by selecting the Environments to be imported, and for each Environment
you selected, specify the Schema containing the dictionary information (the Sage X3 schema).
Example


- When you are done with the mapping, click on Next.Note
A message comes up indicating the script is running. You can close the window.
- At this point you can click on for the next script. Note
The scripts are running as a batch in the background and it is not necessary to wait until one script is completed to run the next one.
TipTo view the status of a script execution, click on Refresh
 and review the
Status column.
and review the
Status column.