Creating a View
To create a new View:
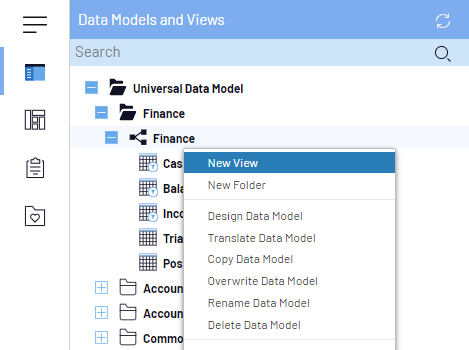
- In the Data Models and Views tab, right-click on a Data Model and select New
View.
- Among the different categories, select a view type.Note
This setting can be changed later by clicking on
 in the Settings menu (right panel).

In the next step define a
structure for the new View, which can be different according to the type (typically these are the Groups,
Pivots and Columns of the View).
Different Views will have various settings according to the type of View. All these settings can be changed in the future in Properties.
The new screen prompts the user to enter the essential properties required to design the View.
When creating a worksheet:
- Enter a name.
- Choose the Columns, Groups and Pivots by clicking on Add .
- Type the name to filter the list (or select from the drop-down menu). Choose one or more Fields.
- Click on OK to confirm the chosen Fields.
- Click on Confirm.Note
The order of the Fields can be changed, moved or deleted by using the Select option.
Example

The newly created View will open in a new window.
For every opened tab, an information panel is available in the lower right hand corner.
When hovering with the mouse on the icon ![]() , a panel with appear with information such as:
the number of records and the time required to load, the Data Model, the View name, owner
and availability. If the data comes from an OLAP Cube, the last refresh date will also be
displayed.
, a panel with appear with information such as:
the number of records and the time required to load, the Data Model, the View name, owner
and availability. If the data comes from an OLAP Cube, the last refresh date will also be
displayed.