Selection Page
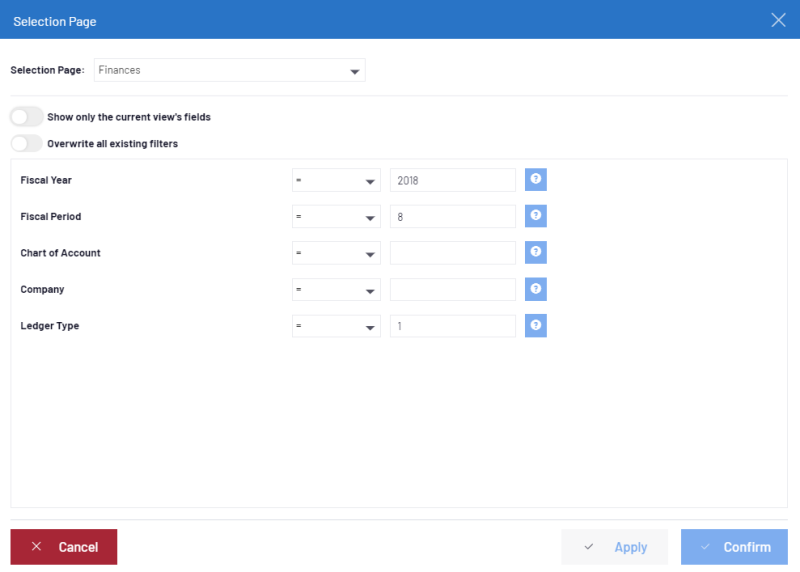
The Selection Page dialog allows users to apply Filters to their data.
All the Filters entered will be combined with the AND operator in the results filter.
It will be added to existing Filters, unless the Overwrite all Existing Filters option is ticked, in which case only the locked Filters will be kept.
- The Selection Page window will open after double-clicking on a View for which the properties assigned a
Selection Page.Note
If one of the Fields appears with a grey background, this is because its value has been specified as mandatory in the Selection Page definition (refer to Adding / Editing a Selection Page for more details).
- Click on
to open a Prompt dialog to select existing values instead of manually typing them in the Filters dialog.
- Make the appropriate choices from the available list.
- If more than one Selection Page is available, you can change it from the Selection Page drop-down list at the top.
- Choose the appropriate values for the Fields to
apply to a Filter and click on Confirm to open the Data Model in a Worksheet View.Note
After applying filters, they will appear at the bottom of the page.
If you do not make any selections and click on Confirm, the worksheet will produce itself without filters.
You can edit them by
hovering over their boxes and selecting .

Adding / Editing a Selection Page
To add / edit a Selection Page:
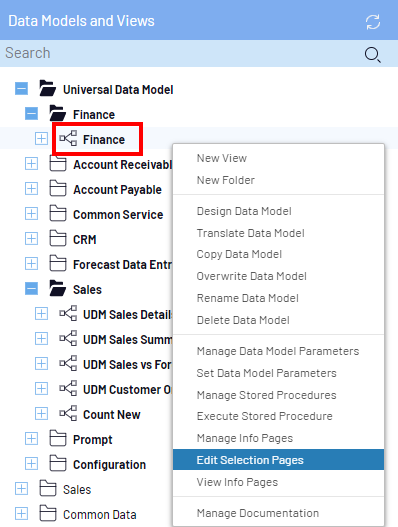
- In the Data Models and Views tab, right-click on the Data Model and select Edit Selection Pages.

- In the upper right hand corner, click on
to add a new Selection Page.
- Click on
to edit the existing filter.

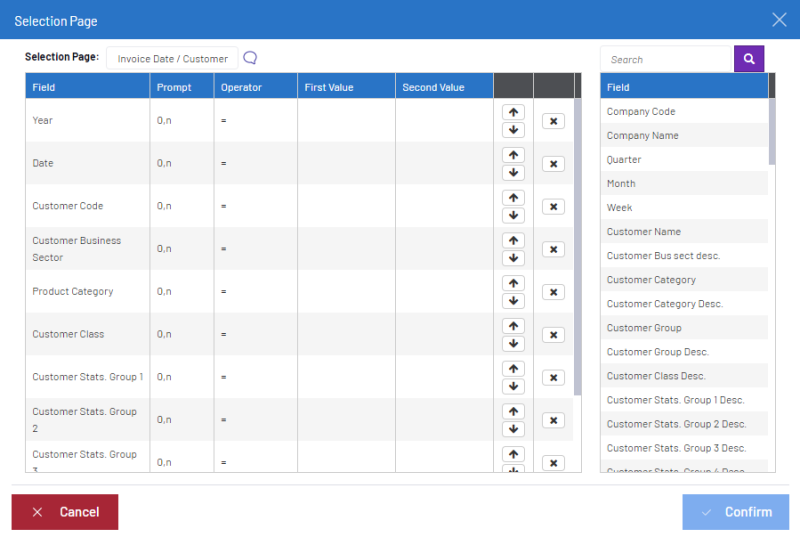
Both options will open the following window:

The left section of the window lists the Fields contained in the Selection Page.
The right section ( the one under the Search bar) lists all available Fields from the Data Model Designer.
To add a Field to the list:
- In the right section, click on the Field you want to use for the Selection page.Note
Fields selected on the left may be moved to the desired position and reordered by using the
and
.
- Define the Field by choosing the appropriate option. Is the Field mandatory or not. Select one of the
following:
- Option 0,n means that a minimum of zero value must be entered for that field or a maximum of n (any value).
- Option 1,1 means only one value MUST be entered, while option 1,n means at least one or many values must be entered. 1,1 and 1,n determine mandatory values for the Selection Page.
- In the Operator column, select the operand you want to apply (refer to .Advanced Filters for more details
- In the First and Second Value columns, select a value in the drop-down list.Note
Each selected Field can have a default value specified in the text box.
The default value can be a constant or a global parameter variable code.
- To remove a Field from the list: just click on
that appears beside the text box.
- Click on Confirm when you are done.
