Authentication with OAuth

For examples of OAuth configuration, click here.

General tab parameter Description
Activate

The toggle button defines whether the provider should be available for the users to log in from the Login page.

When this option is enabled, a new button is displayed under External Accounts on the Login page.

Description

This is the text that will be displayed for the button that will be shown for the created provider on the Login page.

By default, it is set as New Provider and it is recommended that the text be changed to a label that is meaningful for the users when they go on the Login page.

Client ID

Enter the unique public identifier provided by the authorization server.

Client Secret

Enter the unique secret string that is only supposed to be known by the Web Server and the authorization server. The value set is secretive and therefore the text will be hidden after setting it.

Discovery Endpoint

This endpoint is optional in the configuration screen. The intention of the endpoint is to automatically populate the other required endpoints by retrieving the information from the available metadata.

After filling the Discovery Endpoint field, click the Discover button to populate the values for Authorization Endpoint, Token Endpoint and User Info Endpoint. A drop-down list will be accessible for Scopes with the available scopes for the provider. Also, the User Identifier field will contain a drop-down list with available claims that can be used.

This endpoint is available via /.well-known/openid-configuration.

Authorization Endpoint

This URL will be the first endpoint that users will go to authenticate themselves for the provider. This parameter also gives permission for the provider to give Web Server limited information.

This endpoint is available via /authorize.

Token Endpoint

This URL will get the Access Token that will be used to obtain the user's information.

This endpoint is available via /token.

Scope

These values will define the permissions to be given to Web Server. The permissions given should be enough to get the user's information to do the user mapping.

Typically, the scopes needed would be openid, email, offline_access, however each provider may have different scopes.

For example, offline_access is added by default, but if it is not an available scope then it should be removed.

Redirect URLs

The URLs defined for the Web Server and Excel Add-in must be saved in the authentication server.

If the authentication server needs to be redirected to another URL, change the URL in this field.

For Excel Add-in, the port number must be the one that is available on the local machine where the Excel Add-in is installed.

User Info Endpoint

The endpoint will retrieve the information of the user logging in. The information returned will be used to log into Web Server.

This endpoint is available via /userinfo.

User Identifier

This parameter specifies the claim that will be used to retrieve the mapped value in the Web Server user information.

For example, if the User Identifier is set to email, this parameter will search for the value of email based on the User Info Endpoint and use it to compare and map the Web Server user.

Prompt

This parameter defines what authentication window will get displayed when logging into Nectari.

Click the Prompt field and select the appropriate options from the drop-down list:

  • login: Displays a Sign in screen asking you to enter your credentials. It will do so every time you click an external account button.

  • select_account: Displays a screen that lets you choose from a list of accounts used in the past. If one of them is already connected, it will not ask for credentials.

  • consent: Same as select_account but the screen also asks you to give permission. It will do so every time you click an external account button.

    If you are using Google, you must select this option for the automatic reconnection to work properly.

  • none: If you are already logged in with the provider, it does not display any prompt. If no account is logged in, it prompts for credentials.

Note

These four options are defaults from the OAuth 2.0 standards. Each OAuth provider may provide other Prompt options in addition to the default ones. In that case the administrator can just enter the value in the Prompt field.

Important

The Prompt option is not a feature that helps secure the authentication; it just tells the browser what to do when authenticating, but it can be bypassed by the user.

If the goal is to force users to always re-enter their credentials, setting the prompt value to login is not enough. You must also select the Force re-authentication option.

Force re-Authentication

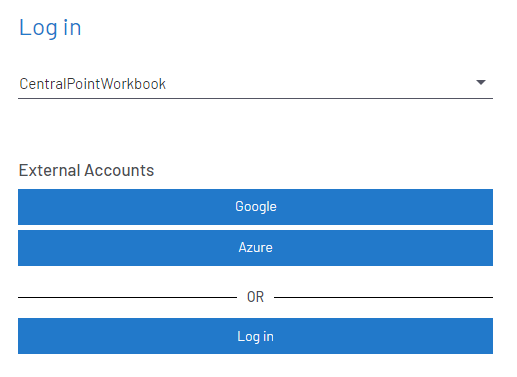
Select this option if you wish users to always re-enter their credentials. This setting will force the user to re-authenticate depending of the delay that have been set in the Delay field. (The delay is in seconds.)

For example, if the delay is set to 0, the user will need to authenticate every time. If it is set to 21600, every 6 hours, the prompt will force the user to authenticate when clicking the Log in button.

The max value is 86400 seconds.

Note

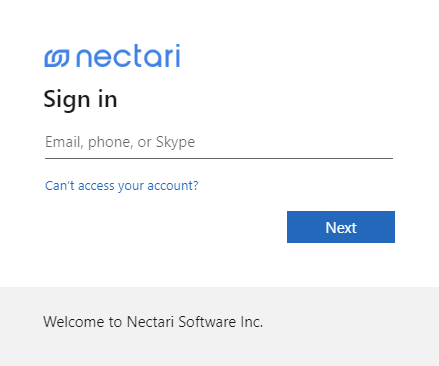
Make sure that your OAuth provider supports the max_age parameter. Google does not support this parameter.

Allow Remember Me Select this option to enable the browser to keep the authentication settings.


Users tab parameter Description
Username

Indicates the Web Server user name that is used to log in.

Name

Indicates the Web Server user's name associated to the username.

Email

Indicates the Web Server user's email associated to the username.

User identifier

This is the only editable parameter. It specifies the value that is expected to be returned by the OAuth provider for the specified User Identifier claim under the General Tab.

For example, if the claim specified for User Identifier is email, this field should specify the user's email associated to the provider.