Installing the Certificate
Before starting anything:
- Make sure you possess a valid certificate with a .pfx extension provided by the customer (refer to Checking the Certificate Expiry Date for more details).
- Make sure that this certificate was issued by a Certificate Authority (if you have a Self-signed certificate, the Excel Add-In will not work).
- Open the certificate.
- In the Certification Import Wizard window, select Local Machine (to be available for the whole server and not just for one specific user).
- Click Next twice.
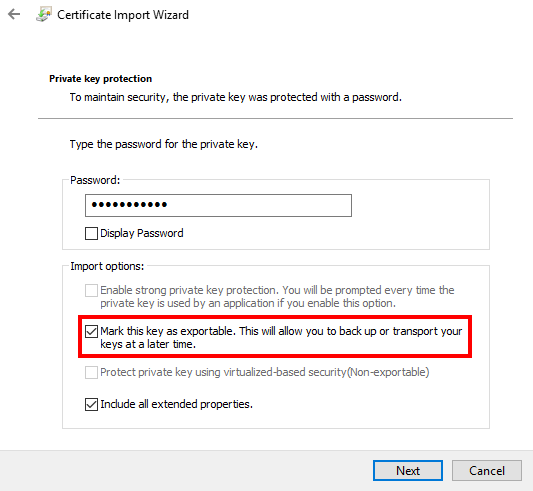
-
In the Password field, enter the password provided by the customer and tick the Mark this key as exportable. This will allow you to back up and transport your keys at a later time. checkbox.
 Tip
TipTicking this checkbox can help you with reusing this key to install several servers (for example, one server for the Web and another one for the Distribution) and with setting them up.
- Click Next twice.
- Click Finish and then OK at the confirmation message box.
Checking the Certificate Expiry Date
- Press the Windows key + R to open the Run window.
- Enter certmgr.msc and press the Enter key.
- In the left pane, expand the Personal folder and click Certificates.
- On the right, check the certificate date under the Expiration Date column.
Determining the Certificate Type
In the Certificates Management window (enter certmgr.msc in a Run window and press the Enter key:
- Double-click the certificate to open it.
- Under the General tab, at the Issued to line, check if it's a wildcard certificate (*.domainname = applicable to a domain and all its subdomains) or if it's a certificate applicable only to specific name(s)).
- If it's applicable to specific name(s), go to the Details tab and click the Subject Alternative Name field to get all the names authorized by the certificate.Note
Take careful note of these names as you will need them later on for the installation process (refer to Installing Nectari).
ImportantOnly the names among the list are authorized to get access to the Web Central Point Configurator. Any other names will be blocked.
- Close the window.