Column Properties
Once a field has been added to the columns its properties can be set within the Data Model Fields Table section.
Below is a list of the available properties for a field with a description and possible values:
|
Property Name |
Description |
Possible values |
|
|
|
|
|
General:
|
||
|
|
|
|
|
Column Group Heading |
When a Data Model is opened in a worksheet view, column headers can be grouped. This is used to show the columns that are related to the same entity. For example, if Customer is specified in this property for both Customer Number and Customer Name, the resulting column header in a worksheet would be as follows: This property is used in conjunction with the Column Heading property. |
Free text |
|
Column Heading |
Column Group Heading and Column Heading are combined to identify the columns of a Data Model. |
Free text |
|
Visible Level |
This property is used to identify the minimum authorization level applicable when displaying the specified column. Column Visible Level is one of the elementary Authorizations that can be set for a user within Data Model Authorizations. The value of this elementary Authorization is compared to the Visible Level property to determine if a user is allowed to see the column. (00 corresponds to the Admin user.) |
00-No Authorization 10-Basic 20-Intermediate 30-Advanced 40-Manager 50-Administrator 60-System Administrator 99-Security Officer |
|
Format |
Display Format for Numbers, Currency, Date & Time, Percentages and Text. Each category may have several options, as applicable (for example for Numbers one can specify decimal places and leading zeros). A preview of a formatted expression is provided. From Nectari Version 9, you can now display images or add hyperlink to your worksheet (for more details, refer to Additionnal Formats for more details). |
Selected from a list |
|
Column Type (Fields) |
There are three main categories of Column Type (Fields):
|
Dimension key Dimension data
Measure Data Measure Calculated
Description data |
|
Description Field |
This property allows linking a Dimension Key to its Description Field (e.g. Customer Account Number with Customer Name, Item Code with Item Description). If data is grouped by Item Code in a worksheet, the grouped lines could contain both the Item Code and its description, depending upon the Description Format property. |
Selected from a list of the available fields within the Data Model |
|
Description Format |
Specify the layout, in a worksheet or a graph, of Dimension Fields and their Descriptions. The Title indicates the name of the field, the Description refers to the value of the description field associated with the field and Code is the value of the field itself. For example, if the Description field for a Customer Code was the Customer Name, and the Description Format is Title-Description-Code, then a worksheet grouped by the Customer Code would display each group as something similar to Customer code-123-Company ABC, where 123 is the Customer Code and Company ABC is the name of customer 123. You have the same option with the "-" separator or without the separator. |
Title-Code-Description Title-Description-Code Title-Code Title-Description Code-Description Code Description Description-Code Title Code Description Title Description Code Title Code Title Description Code Description |
|
Prompt Query |
Prompt assigned to this column. |
Any Data Models that are defined as a prompt. |
|
Prompt Sort Order |
If the current Data Model is used as a prompt, this property will define how the values in the prompt window will be sorted. |
None ASC DESC |
|
Subtotal |
Specify which kind of summary operation will be used to calculate subtotals when data is grouped. |
None Sum Min Max Avg (average) Count Count Distinct OnCalcul PercentOfTotal |
|
Subtotal Restrictions |
How to apply restrictions on what grouping levels should show subtotal values. |
Subtotal restrictions window |
|
Subtotal Exceptions |
Allow a different subtotal type for a selected group (if subtotal is PercentOfTotal, exceptions will be ignored). |
Subtotal exceptions window |
|
OnCalculation |
If the Subtotal property is set to OnCalcul, this property defines a script used to calculate the subtotal. |
Refer to the JavaScript Builder section |
|
Calculation |
Customize a SQL calculation for the calculated column |
SQL syntax, refer to the SQL Script Builder |
|
Parameter Name |
Specify an Nectari Global Parameter name which is used to set up application and process Links, Dashboard Filtering and setting up Dashboard Filtering Panels (refer to Global Parameters). |
List of Global Parameters |
|
|
|
|
|
Edit:
|
||
|
|
|
|
|
Edit Level |
This property is used to define the minimum level of security that a user must have to be authorized to edit the value of the current column. Column Editable level is one of the elementary Authorizations that can be set for a user within the Data Model Authorizations. The value of this elementary Authorization is compared to the Editable level property to determine if a user is allowed to edit the value of related column. (Level 00 is only for the Admin user.) Note: If a column is to be editable, one or more dimensions must be set as a key in order to write properly into database. |
00-No Authorization 10-Basic 20-Intermediate 30-Advanced 40-Manager 50-Administrator 60-System Administrator 99-Security Officer |
|
Edit Calculation |
This is used to recalculate this specific column when any changes occur in one of the dependent columns. For example in the Forecast Total column (that represents the total of the 12 columns of Forecast Amount), you could recalculate the total column when any of the forecast values change in one of the 12 columns by adding a script (necResult=Forecast1+Forecast2+Forecast3). |
Refer to the JavaScript Builder section |
|
Split By Ratio On |
Used for splitting any amount entered on a total line using a ratio based on this specified field. Applicable only if this column is editable. For example, a budget entry Data Model could have this property set to the actual amount, for the budget amount field (thus any budget values entered at a group level would be split at the detail level according to the ratios of the actual amounts). |
Selected from a list |
|
Validate Against Prompt |
When a prompt is set on this field, a validation will run so that the value is part of the prompt and block non-existent values if set to yes. With No, every value could be entered in this case. |
Yes No |
|
|
|
|
|
Advanced:
|
||
|
|
|
|
|
(Source Field Name) |
Database field name of the current column. |
Cannot be changed. |
|
(Source File Name) |
Database table or view name for the current column. |
Cannot be changed. |
|
(Source File Alias) |
Database table or view name for the current column (if a table or view has been added more than once). |
Cannot be changed. |
|
|
|
|
|
Data Type |
Database field type. Automatically defaults from the database, but can be changed for calculated fields. |
CHAR NUMERIC INTEGER DATE TIME DATETIME |
|
Data Length or Decimal Precision |
If data type is NUMERIC, this property determines the number of decimal places that will be considered when displaying data. If data type is CHAR, the property determines the field length. This automatically defaults from the database, but can be changed for calculated fields. |
Numeric |
Additionnal Formats
Regarding the use of worksheet, with the version 9, Nectari gives you more options. You can now display images extracted from your database (or URL) and add hyperlinks.
If you want to add a hyperlink, refer to Add a hyperlink.
If you want to add images from your database, follow the steps below or refer to Display image from a URL link.
Display image from your database
Only JPG, PNG and GIF formats are supported.
- Add Blob (Binary Large OBject) data to your database.

- In the Data Models and Views tab, right-click and select New Data Model to create a Data Model based on the Blob data.
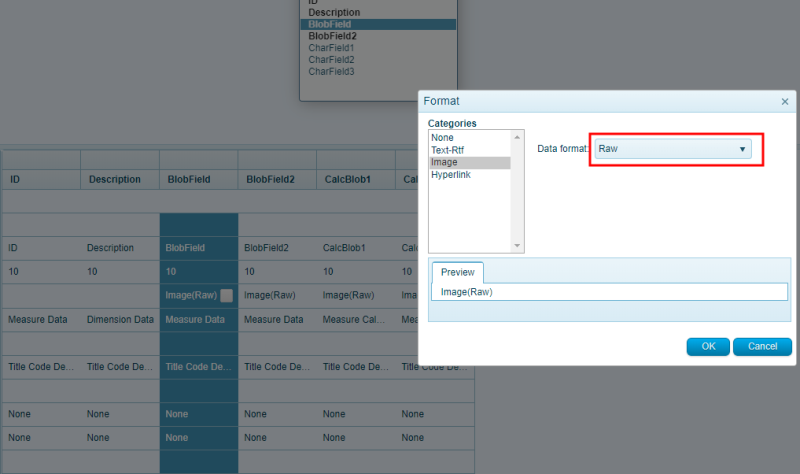
- In the Data Model Designer, set up the Format field:
- In the Categories section, click on Image.
- In the Data format drop-down list, select Raw and click on OK.
 />
/> - In the upper right hand corner, click on File and select Save Data Model.
- Back to the Data Model and Views tab, create a New View from the Data model where you set up the Format field and select Worksheet.
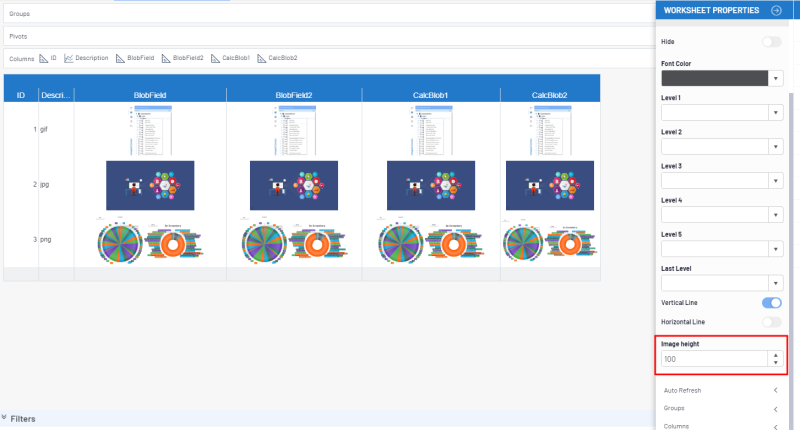
- Add the Image (RAW) fields and set up the Image Height in the Worksheet Properties ( click on
to get access).
Display image from a URL link
- Prepare the URL link in your database tables.

- In the Data Models and Views tab, right-click and select New Data Model to create a Data Model.
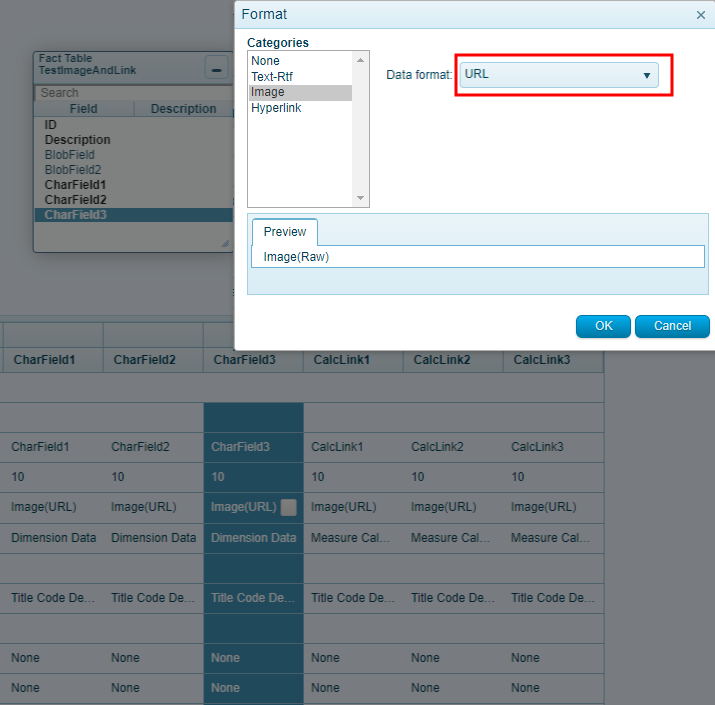
- In the Data Model Designer, set up the Format field:
- In the Categories section, click on Image.
- In the Data formatdrop-down list, select URL and click on OK.
- In the upper right hand corner, click on File and select Save Data Model.
- Back to the Data Model and Views tab, create a New View from the Data model where you set up the Format field and select Worksheet.
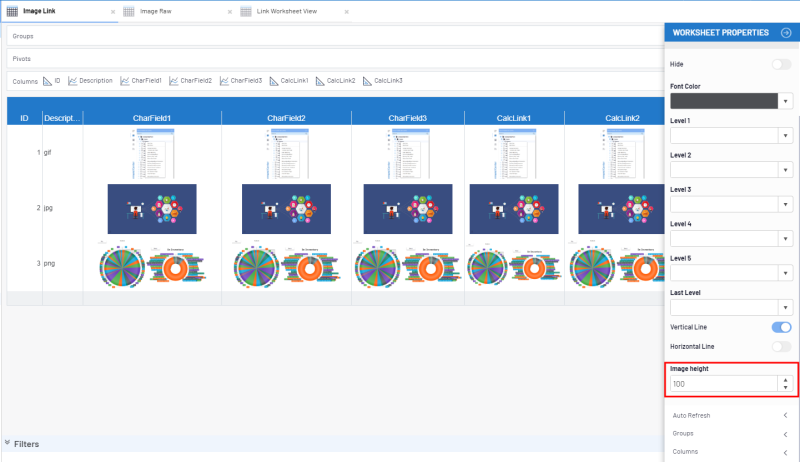
- Add the Image (URL) fields and set up the Image Height in the Worksheet Properties ( click on
to get access).
Add a hyperlink
- Prepare the URL link in your database tables.

- In the Data Models and Views tab, right-click and select New Data Model to create a Data Model.
- In the Data Model Designer, set up the Format field:
- In the Categories section, select on Hyperlink and click on OK.
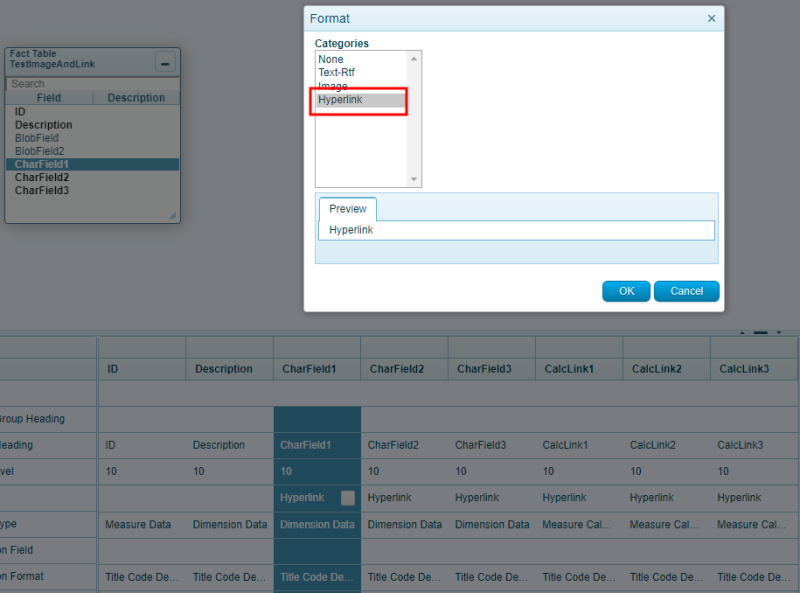
- In the upper right hand corner, click on File and select Save Data Model.
- Back to the Data Model and Views tab, create a New View from the Data model where you set up the Format field and select Worksheet.
- Add the Hyperlink (URL) fields.
- By clicking on the link in the worksheet grid, a new window will open to display the URL in a browser.
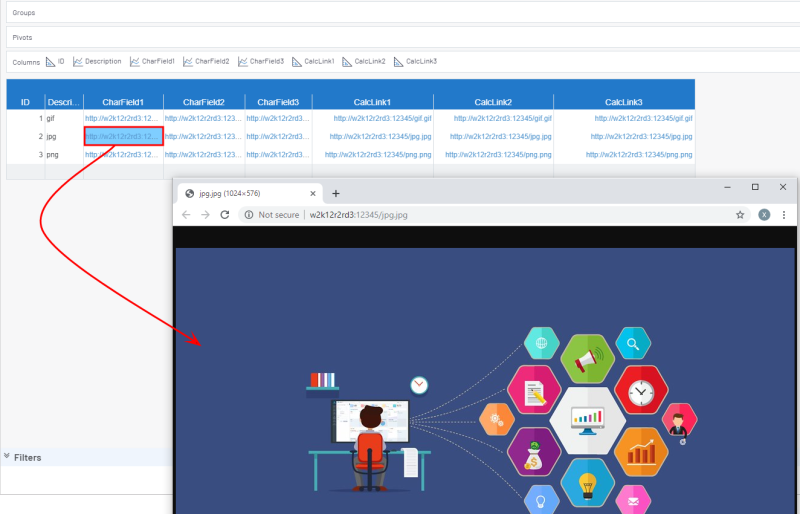
If you do an export of the worksheet containing the hyperlink, please proceed as follows before opening the file in Excel:
- Open the link in Internet Explorer and make sure to select any option that will save the session data in cookies (like the Remember me feature when logging in) (right after the links should work on other browsers)
OR - Change the registry key value: (Please refer to this link for more information.)
- Quit any programs that are running.
- Press the Windows + R keys to open the Run window.
- Enter regedit and press the Enter key.
- In the Registry Editor, browse to one of the following subkey (create the keys when they do not exist):
- For a 32 Bit version of Office on 64 bit version of Windows HKLM\SOFTWARE\Wow6432Node\Microsoft\Office\9.0\Common\Internet\
- For a 32 Bit version of Office on 32 bit version of WindowsHKEY_LOCAL_MACHINE\SOFTWARE\Microsoft\Office\9.0\Common\Internet
- For a 64 Bit version of Office on 64 bit version of WindowsHKEY_LOCAL_MACHINE\SOFTWARE\Microsoft\Office\9.0\Common\Internet
- Right-click on the Internet Subkey, click on Edit and select New then DWORD.
- Enter ForceShellExecute as Value Name and open it.
- Set the Value Data to 1 and click on OK.
- In the Registry Editor, click on File and select Exit.
Please note that using this method (ForceShell) will bring some differences regarding Office behavior.
- Difference 1: Files opened from Office will open in separate instances
- Difference 2: A linked workbook does not open when you click a hyperlink in an Excel 2010 workbook
- Difference 3: A second presentation does not start until the original presentation is finished in PowerPoint
- Difference 4: A warning message will come up when opening files from within Office
- Difference 5: Links to Excel open without going to the right sheet, and links to Word open without going to the right bookmark
For more details regarding those differences, click here to visit the Microsoft Documentation.
