Configure the Extractions
After configuring the source and destination connections, you need to import the Sage Intacct zip templates to create extractions.
You then need to validate and build the extractions. This will create the tables and validate all SQL queries or calculated fields. Lastly, you need to run the extractions to populate the database tables.
You can choose between synchronization and consolidation extractions. If you only have one company and want to replicate the database, you will use the synchronization extractions. If you have multiple companies, you will use the consolidation extractions.
You need to configure three extractions (for consolidation, repeat for each company):
-
Extraction with Incremental Refresh which uses the “Process Deleted Records” functionality in DataSync.
-
Extraction with Incremental Refresh which uses Sage Intacct smart events and triggers to handle deleted records.
-
Extraction without Incremental Refresh.
Next, you need to add a Global Variable:
-
Create and Configure the INTACCT_SCHEMA Global Variable.
Configure the incremental refresh extraction
The Refresh extraction is used for tables that have a valid Last Modified Date.
-
In DataSync, import the extraction (see Importing an Extraction for further details):
-
Click the Import
 icon located on the upper right-hand corner.
-
In the Import Extraction window, click the Choose a zip file hyperlink and browse to the location where you saved the DS_[Software-Version]_[Extraction-Version]_Sage Intacct with refresh DS-SYNC.zip file or drag it directly into that window. Click Next.
-
The default extraction type is already selected. Click Next.

-
In the Description field, enter Refresh for the name. You can also add the company name.

-
Enter the company name in the Unique Identifier field.
-
Enter CYPID in the Column Name field.
-
Select the appropriate Refresh consolidation source connection and the Data Warehouse destination connection (as described in Configure the Connections).
-
Click Add in the Destination Schema drop-down list to add the Intacct schema.
-
Click Import.

-
The Extractions window will automatically switch to the Tables window. Verify your tables and make sure that all fields are present. If some fields are missing, redo the import process.
 Note
NoteIf you have already created custom fields in Sage Intacct, these fields are not yet synchronized. You will need to go to each of their tables and check the Sync option. You will also need to make these fields appear in the corresponding data models via the Data Model Designer, by double-clicking on the field in the related table in order to analyze them.
-
Repeat these steps for the DS_[Software-Version]_[Extraction-Version]_Sage Intacct with refresh DS-SYNC - TRG.zip and for each consolidation extraction.
-
-
Configure the reporting periods in the Glaccountbalance table following the steps in GL Account Balance Synchronization.
-
Validate and build the Refresh extraction:
-
Click Extractions on the left to return to the Extractions page.
-
Select the Refresh extraction in the list and click the Validate and Build
 icon.
icon.
-
In the Validate and Build dialog box, select the Drop the previously created object and recreate the objects... option and click Build.

-
Wait for the process to be done. A validation report is displayed to give you a quick overview once the process is finished. The results are displayed in the Status column. If there is an error, click the hyperlink in the Error column to view the Log Page.
-
For subsequent extractions (companies), select Only Add Missing Tables... and wait for the process to be done. This will merge all tables, fields, and indexes into the destination tables.
-
-
Run the Refresh extraction:
-
Select the Refresh extraction in the list and click the Run Extraction Now
 icon.
icon.
-
Select the tables to be populated.
-
In the upper-right hand corner, select Truncate and Load and click Run. This will replace all data in your destination with the current data from your source.
-
Wait for the process to be done. When the process is finished, the results are displayed in the Status column. If there is an error, you can view more details on it by clicking on the hyperlink in the Error column, which leads to the Log Page.
-
Repeat these steps for each consolidation extraction.
-


Configure the non incremental refresh extraction
The No Refresh extraction is used for tables that do not have a valid Last Modified Date.
-
In DataSync, import the extraction (see Importing an Extraction for further details):
-
Click the Import
icon located on the upper right-hand corner.
-
In the Import Extraction window, click the Choose a zip file hyperlink and browse to the location where you saved the DS_EXTR_[Software-Version]_[Extraction-Version]_Sage Intacct w_o refresh DS-SYNC.zip file or drag it directly into that window. Click Next.
-
The default extraction type is already selected. Click Next.
-
In the Description field, enter No Refresh for the name. You can also add the company name.
-
Enter the company name in the Unique Identifier fields.
-
Enter the CYPID in the Column Name field.
-
Select the appropriate No Refresh consolidation source connection and the Data Warehouse destination connection (as described in Configure the Connections).
-
Click Import.
-
The Extractions window will automatically switch to the Tables window. Verify your tables and make sure that all fields are present. If some fields are missing, redo the import process.
-
Repeat these steps for each consolidation extraction.
-
-
Validate and build the Refresh extraction:
-
Click Extractions on the left to return to the Extractions page.
-
Select the Refresh extraction in the list and click the Validate and Build
icon.
-
In the Validate and Build dialog box, select the Drop the previously created object and recreate the objects... option and click Build.
-
Wait for the process to be done. A validation report is displayed to give you a quick overview once the process is finished. The results are displayed in the Status column. If there is an error, click the hyperlink in the Error column to view the Log Page.
-
For the subsequent extractions (Companies), select Only Add Missing Tables... and wait for the process to be done. This will merge all tables, fields, and indexes into the destination tables.
-
-
Run the No Refresh extraction:
-
Select the No Refresh extraction in the list and click the Run Extraction Now
icon.
-
Select the tables to be populated.
-
In the upper-right hand corner, select Truncate and Load and click Run. This will replace all data in your destination with the current data from your source.
-
Wait for the process to be done. When the process is finished, the results are displayed in the Status column. If there is an error, you can view more details on it by clicking on the hyperlink in the Error column, which leads to the Log Page.
-
-
Repeat these steps for each consolidation extraction.
Create and Configure the INTACCT_SCHEMA Global Variable
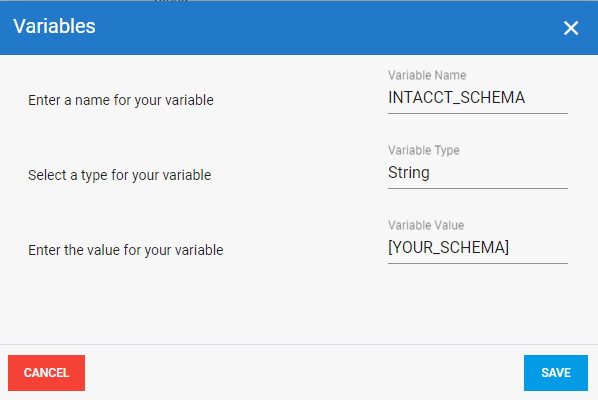
Intacct users must now create a Global Variable called INTACCT_SCHEMA and set the value to the same schema specified in their extractions. This allows post-execution scripts to read through data warehouse tables and insert missing fields where needed.
-
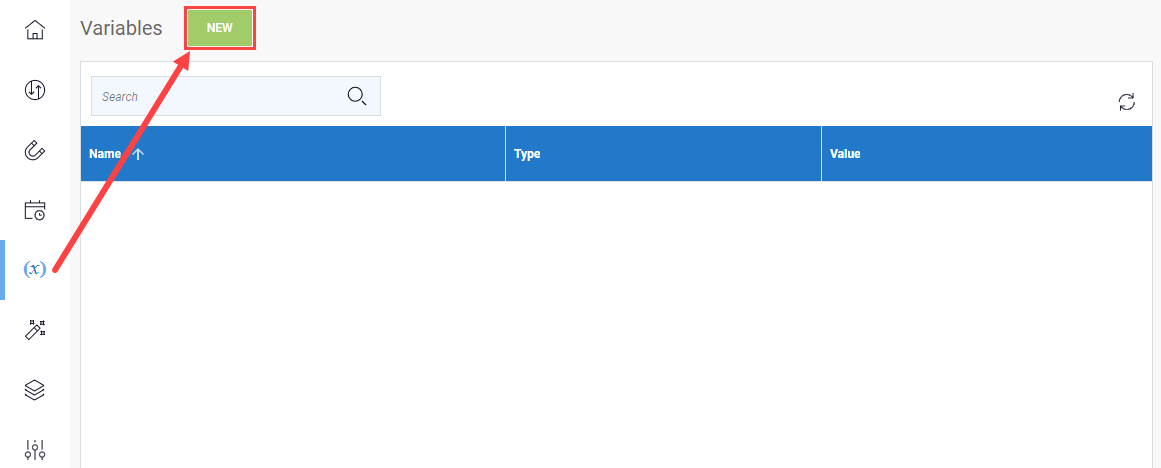
In DataSync, navigate to the Variables menu.
-
Add a New Variable.

-
Configure your variable as pictured below. Replace [YOUR_SCHEMA] with the schema name defined in your extractions, and click Save.
GL Account Balance Synchronization
For DataSync to be able to read GL account balances directly from Sage Intacct, users must create Reporting Periods for each year that will be reported on in Nectari.
To modify the filter in DataSync:
-
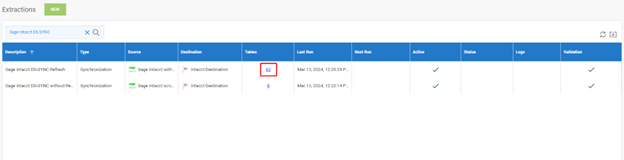
Locate your tracking-enabled synchronization/consolidation extraction(s) and click on the number under Tables.
-
Search for balance using the text box and hover over the Filter field for the Glaccountbalance table. Click on the icon to edit the filter.
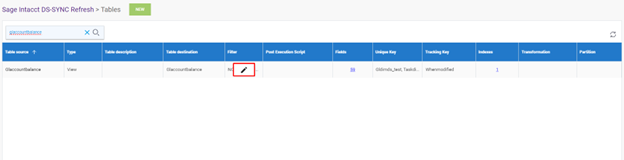
-
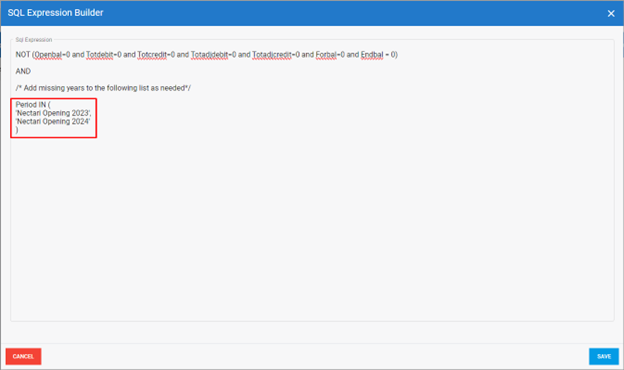
Within the brackets following Period IN…, enter your Reporting Period names in a comma-separated list. All items in the list must be wrapped in single quotes. View examples and screenshot below for reference.
Example list:
‘Nectari Opening 2020’,
‘Nectari Opening 2021’,
‘Nectari Opening 2022’,
‘Nectari Opening 2023’,
‘Nectari Opening 2024’