References Configuration
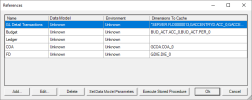
A reference is an abbreviated name denoting a specific Nectari data model that has been published for Excel and a Nectari environment where the data for this Data Model can be retrieved.
A reference also helps define the caching strategy used by Excel Add-in for its cache system.
Users create a reference for each data model they intend to access in an Nectari formula within their workbook. Of course, if a user intends to access data from several different data models and/or environments then several references can be created. The number of references that can be created within a workbook is unlimited.
To configure your references:
References, cache and performance
References are used in a cache system to improve the performance of formulas.
Optimal performance is achieved when the cache to be generated is larger. Therefore, in general, it will be preferable to use only one reference per data model instead of several separate references generating small caches.
On the contrary, performance will be negatively impacted when cached fields are used in the following situations:
- Exclusion / NOT (ex: Account NOT 40000)
- Range of alphanumeric values (e. g. Company between AAAA and BBBB)
- Date filter (ex: 2019-01-01)Note
We suggest that you evaluate different configurations and choose the most efficient one.
Refer to Cache Optimizer to learn how to get reference and formula optimization advice.
Creating a New Reference
- Click Add to create a new reference or Edit to update an existing one.
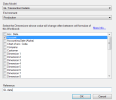
- Select the data model you want to access through this reference from the list in the Data Model field.
- Select the environment containing the data you want to access from the list of the Environment field.
-
Select one or many Dimensions where the values will change.
-
Enter the reference name in the Reference field and click OK to save new or existing references. The reference is now displayed in the References window.
-
Select it and click OK to close the References window.
To better understand why and how dimensions should be selected in step 4, it is important to know that the cache system analyzes the formulas being executed, and automatically attempts to generate and execute formulas which it thinks might be used in other cells within your worksheet.
To better explain the caching system:
Suppose a user configures a formula which calculates the Sum of Sales for a specific product for the Current Year (operation=Sum; field=Sales; Dimensions[Product=A;Year=Current]). It may be useful to the end user for the system to:
-
Pre-calculate the sum of sales for every product for the current year.
-
Pre-calculate the sum of sales for the specific product for every year in our database.
-
Pre-calculate the sum of sales for every product for every year in our database.
It would be quite easy for the system to automatically select option 3, although this is the most expensive option in terms of time and space in the cache. It would be more efficient if the end user could provide additional information to the Caching System which could help it figure out which option provides the information that will be required within the Worksheet.
If the user was developing a report displaying the sales for a product across several years (Year Dimension changes from cell formula to cell formula) then option 2 should be selected. However, if the user was developing a report to display the sales across products for the current year (Product Dimension changes and the year remains fixed from cell formula to cell formula), then option 1 is the best choice.
Setting Data Model Parameters
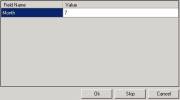
You can change the data model parameters without having to log out of the application. Comparable to the Web Client a dynamic value (e.g. 7) can be set for an existing parameter (e.g. Month) of a given data model (e.g. Budget Entry) directly from the Excel Add-in files.
This parameter is used as a dynamic variable (e.g. $$month) in the execution of a script that was configured earlier, in the Web Client’s SQL Scripts Builder tool, located in the Data Model Designer window. By setting a value, the script will use that value in its execution.
-
Click the Set Data Model Parameters button.
-
The field names are based on the Data Model Parameter(s) you configured in your Web Client’s Manage Data Model Parameters window.
The Value column displays the default value configured in the Web Client. To set a value for each Data Model parameter, enter or change the value in the Value column for each field name.
-
To bypass values in the Data Model Parameters window, click Skip.
-
Click OK to save the changes. The Clear cache function will be automatically called after updating the data model parameters to refresh the data in the worksheet (refer to Clear Cache for more details).
Executing Stored Procedures
You can execute stored procedures without having to log out of the application. Similar to the Web Client, you can execute your data source’s stored procedures from the Excel Add-in files.
-
Click the Execute Stored Procedures button.
-
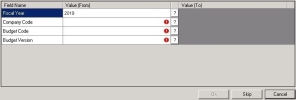
The field name is based on the parameters of the Stored Procedure for the configured data model in the Web Client’s Manage Stored Procedure window.
The Value (From) column displays the default value configured in the Web Client. To set a value for each parameter, enter or change the value in the Value (From) column for each field name.
The
symbol indicates that a value is mandatory for this parameter.
If you click the
symbol, the Prompt window opens and displays a list of values for you to choose from.
-
The Value (To) column will only be available for a range of values.
-
To bypass values in the Stored Procedure window, click Skip.
-
Click OK to save the changes. The Clear Cache function will be automatically called after executing the stored procedure to refresh the data in the worksheet (refer to Clear Cache for more details).


