Reporting Tree
Context
The Reporting Tree feature provides you with a fast and flexible way to build financial Reports based on the structure and hierarchy of your company.
Although the main function of the Reporting Tree is the creation of financial Reports, it can be used in any other functional areas of your business (Sales, Logistics, Manufacturing, etc.). This allows you to build complex hierarchies composed of interrelated business units such as Departments, Cost Centers, Territories, and more.
This hierarchy is built through groups of Nodes that represent an organizational chart, in which each box defined reflects a user-defined context that rolls-up in a hierarchical way.
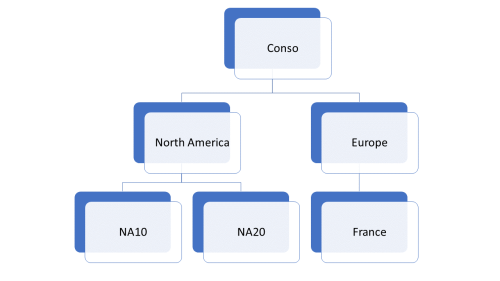
Let’s say that your company (the headquarter) has its departments located in different countries and that these departments have their own subsets.
In this example, Conso is the name of the Headquarter (and because we plan to consolidate data in this report), North America and Europe are the location of the departments, NA10, NA20 and France are their subsets (children).
A visual representation of this:
Thanks to the Reporting Tree, you don't need to manually create a Filter for each subset (NA10, NA20, France). The parent folder (Group Node) simply uses the filter data contained in its children (Filter Node).
By selecting a Node (Filter), you can then view your Reports in a variety of ways, all from one place. The same logic applies when distributing the Reports; it will generate all the required versions of your Reports based on your hierarchical configuration in a single output.
Setting up the Security Level
The Reporting Tree features in Excel are available only if they have been enabled in the Roles:
- In the Administration section
, click on the
Security drop-down menu in the left pane.
- Select
Roles.
- In the upper right-hand corner, select General Roles in the Manage drop-down list.
- Select the Role category (Basic, Security, Manager) you want to give access to the Reporting Tree.
- Under the Excel Add-in section, tick the Reporting Tree options you want to grant to this Role category: Reporting Tree Selector, Reporting Tree Node Selector or / and Reporting Tree Duplicator.
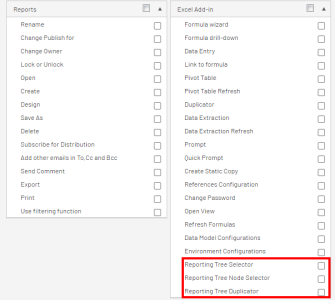
Make sure that the user you are granting access to the Reporting Tree to is also set to the same Role category. Refer to Users for more details.
The first time the user opens a workbook in Excel, the three Reporting Tree options will be clickable. Depending on the one you enabled in the Administration, other options will become grayed out.
To give a user access to the Reporting Tree feature for the Reports:
- Under the Reports section, tick the Use filtering function checkbox.
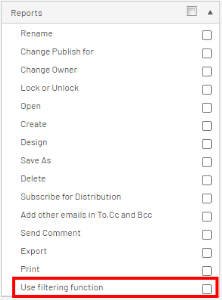
- Click on Apply changes to confirm.
If not ticked, the Reporting Tree feature in the Report properties will become grayed out and the Reporting Tree option on the right pane will be hidden (refer to Using the Reporting Tree in Reports).
Limiting access to the Reporting Tree
You can decide whether or not a user can build their own Reporting Tree by enabling this option:
- In the upper right-hand corner, select General Roles in the Manage drop-down list.
- Select SECURITY in the list.
- Under the Administration section, tick the Manage Reporting Trees checkbox.
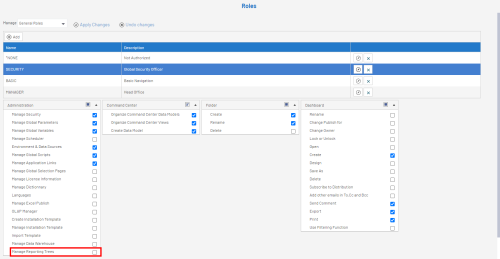
- Click on Apply changes to confirm.
Creating a Reporting Tree
- In the Administration section
, click on
Reporting Trees in the left pane.
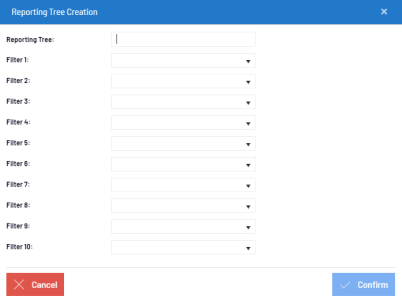
- In the left-hand corner, click on Add New Reporting Tree.

- In the Reporting Tree field, enter a name for the Reporting Tree.
- In the Filter drop-down lists, select the Global Parameters you want to use as Filters.
The Global Parameters you define here will be used as values when you add a Root Level Filter.
- Click on Confirm to finish.
Click on the pencil icon to edit an existing Reporting Tree or on the cross icon to delete one.
Adding Root Level Group and Level Filter
At the Level Group, the Filters you define are gathered on each level from the Root (Root Level Filter) into a group so that the hierarchy stays organized and easy to navigate. It is here that you create the Nodes that will compose your Reporting Tree.
- In the Reporting Tree list, click on the wrench icon of the Reporting Tree you want to apply Filters to.

- Click on Add Root Level Group to start defining the hierarchy of your Filters:

- In the Description field, enter a name for this group.
- In the second field, click on the paste icon to retrieve the value from the Description field or enter the name you want displayed in the tab of your Excel file.
- Tick the Distributable checkbox to make this Node and the Filters within this group available for the Distribution.
- Click on Save to finish the creation of your group.
- Click on Add filter to add Filters to the Group you have just created:

- In the Description field, enter a name for this Filter.
- In the second field, click on the paste icon to retrieve the value from the Description field or enter the name you want to be displayed in the tab of your Excel file.
- Use the Prompt to select a value in the Global Parameters.
- Tick the Distributable checkbox to make this Node and the Filters within this group available for the Distribution.
- Click on Save to finish creating your Filter.
- Click on Confirm to create your structure.
Editing Reporting Tree Filter Node
In the Reporting Tree window, click on Edit:
- If needed, change the name of the Filter in the Description field.
- In the second field, change the name that will be displayed in the tab (sheet) of your Excel file.
- If needed, use the Prompt to select another value in the Global Parameters for the Filters.
- If needed, tick or untick the Distributable checkbox to make this Filter Node available or unavailable to Distribution.
- Click on Save to finish editing this Filter.
- Click on Confirm to save your changes on the server.
If you choose to edit a Reporting Tree Group Node, you will only be able to change the Description name and the one used in the tab (sheet) of your Excel file.
Using the Reporting Tree in Reports
- In the Reports tab, right-click on a Report and select Properties.
- Under the Options section, select the Reporting Tree you defined in the drop-down list and click on OK.
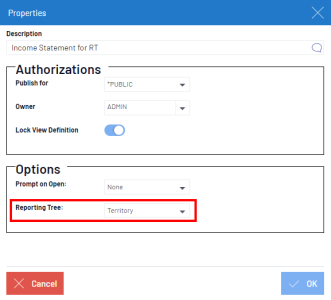
To deactivate the filtering based on the Reporting Tree, select None in the drop-down list.
- Once the Report is loaded, click on
Reporting Tree in the right pane to reveal the tree architecture.
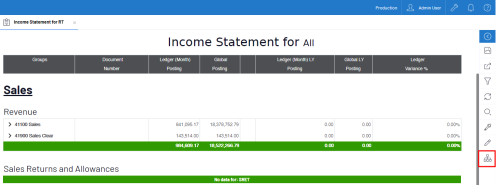
- In the Reporting Tree Filter panel, click on one of the nodes to retrieve data and refresh the Report.
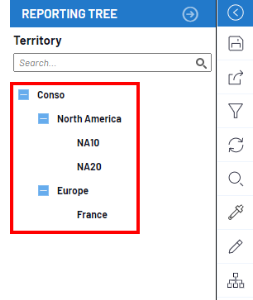
If you select a Group Node , (those represented by a +/- sign), it will automatically include its children (i.e. all the sub-groups and Filters inside the sub-groups below this group).
For the title of your Report, you can use the Dynamic Variables drop-down list to select your Reporting Tree. Using variables will automatically change the main title of your Report when you select different Nodes. Refer to Report Title for more details.
Using the Reporting Tree in the Distribution
For any existing Views in Nectari, you can use the Scheduler to send the Reporting Tree to other users.
- In the Administration section
, click on
Scheduler in the left pane.
- Follow the procedure described in Creating a New Job.
Using Reporting Tree with Excel Add-In
Combined with Excel Add-In, the Reporting Tree allows you to quickly and easily generate several Reports based on specific Nodes, all gathered in one place.
Prerequisites
To use the Reporting Tree:
Make sure to use an Excel file where a Data Extraction (refer to Data Extraction) is set up and a Formula (refer to Formula) is defined.
- In the Excel file, click on Reporting Tree in the menu options to select the Reporting Tree from which to retrieve the Node. If you are not logged in (refer to Login to Nectari Excel Add-in ) a pop-up window will appear so that you may do so.
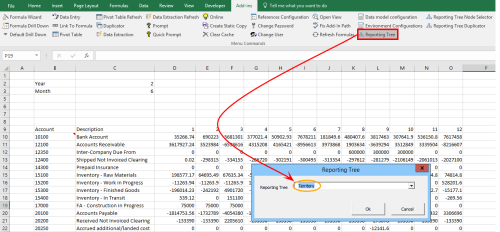
- Click on OK.
Only one Reporting Tree can be used per Workbook.
- Select the cell in the sheet to be used as Reference and click on Reporting Tree Node Selector in the menu options.
- Select the Node from the Reporting Tree you want to retrieve the data. Here, we select the C4 cell and add a description in the B4 cell.
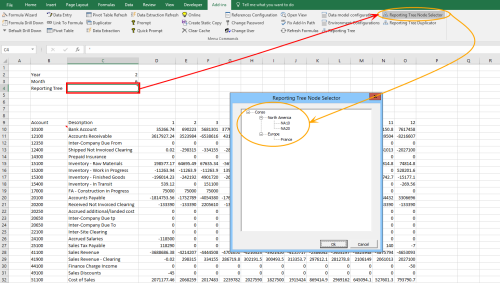
- Click on OK.
The Reference Cell is the cell that contains the data specific to the Nodes existing in the Reporting Tree. It allows you to generate data dynamically when using a Formula or Pivot Tables, or performing a Data Extraction.
Formulas
To create a Formula, select the cell you want to define a Formula for and follow the procedure described in Formula.
Refer to Nectari Formula Drill Down to use the Reporting Tree as a Filter to perform drill down.
Data Extraction
To perform a Data Extraction using the Reporting Tree, refer to Data Extraction.
Please note that refreshing data for the Data Extraction feature can only be done manually by clicking on Data Extraction Refresh.
Pivot Table
To create a Pivot Table using the Reporting Tree, refer to Nectari Pivot Table.
Please note that refreshing data for the Pivot Tables feature can only be done manually by clicking on Pivot Table Refresh.
Open View and Data Entry
For these two features, the Reporting Tree will not be taken into consideration if the Formula is using the Reporting Tree Node as a Filter.
Clear Cache
To clear the cache of Excel Add-In using the Reporting Tree, refer to Clear Nectari Cache.
Reporting Tree Duplicator
The Reporting Tree Duplicator feature allows you to replicate the Reporting Tree structure by taking into account only the Nodes for which you had checked the Distributable checkbox (refer to Adding Root Level Group and Level Filter).
- In the Worksheet, select the Reference Cell (refer to Prerequisites) and click on Reporting Tree Duplicator in the menu options.
- In the Reporting Tree Node Cell field, the position of the Reference Cell should be filled in. If not, select the cell.
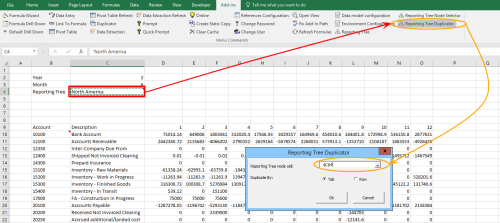
- For the Duplicate By option, choose between Tab or Row.
If you choose Tab:
- One sheet per Node (the one with the Distributable checkbox ticked) will be created.
- The tab name will be the one you defined in the Administration screen of the Reporting Tree for these specific Nodes.
- The Description will change in the cell selected on each sheet as well as the ID of the Reporting Tree Node.
- The Formula that refers to the Reporting Tree Node will automatically be refreshed.
This action can take some time as all tabs need to be generated and all the Formulas will be refreshed at the same time.
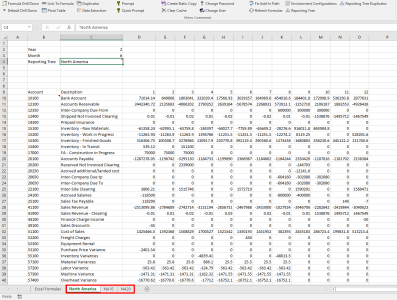
Here, we chose Duplicate by tab. As North America was the selected Node, Excel Add-In automatically add its children (NA10 and NA20).
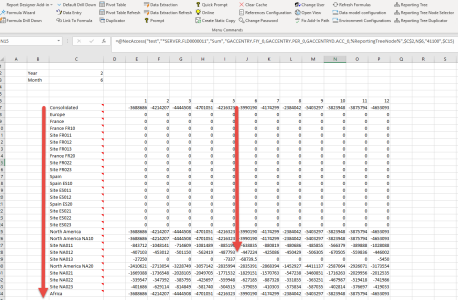
If you choose Row, the row will get repeated for each Node as well as the Formulas.
Here, we chose Duplicate by row. By default, all Nodes inside the Reporting Tree will be generated.
- Click on OK to finish.
